


Hardwood cuttings are sections of mature woody stem used to grow new plants. They are taken after the season’s growth has hardened, usually while the plant is dormant in late autumn or winter. This is one of the simplest forms of vegetative propagation because mature dormant stems are tough, easy to handle and contain stored carbohydrates and water that keep the cutting alive while roots begin to form.
Leafless hardwood cuttings from deciduous plants also lose very little water compared with leafy softwood cuttings, so they do not need the constantly humid conditions required by actively growing cuttings. Hardwood cuttings are commonly used to propagate deciduous shrubs, fruiting plants and vines such as figs, grapes, currants, gooseberries, quince, pomegranates, mulberries, willows, poplars, privet, forsythia, honeysuckle and spirea.
The technique is also used for narrow-leaved evergreen plants such as yews, junipers, arborvitae (Thuja) and false cypress (Chamaecyparis). These plants retain foliage on their hardwood cuttings and therefore need somewhat different handling while they root.
Because cuttings are produced by vegetative propagation, the new plant is genetically identical to the parent plant. This is particularly useful when propagating named cultivars, because plants grown from seed may not retain the same characteristics.
Softwood, Semi-Hardwood and Hardwood Cuttings
The terms softwood, semi-hardwood and hardwood describe how mature the stem is when the cutting is taken. Softwood cuttings are taken from young shoots during active growth, when the stems are still soft and flexible and carry actively transpiring leaves. They usually root quickly, but they also lose water quickly, so they need high humidity while roots develop.
Semi-hardwood cuttings are taken later in the growing season, after the stems have partly matured and become firmer. They still carry leaves but are tougher and lose water more slowly than very soft new growth.
Hardwood cuttings are taken after the stem has fully matured and become woody. With deciduous plants, this is normally after the leaves have fallen and the plant has entered dormancy. Narrow-leaved evergreens can also be propagated from mature dormant wood, but their foliage remains attached.
The general principles behind propagating leafy cuttings are covered separately in How to Propagate Plants from Softwood Cuttings.
Plants Commonly Propagated from Hardwood Cuttings
Hardwood cuttings are useful for a wide range of woody plants, not just fruit trees and grapevines. They are commonly used for deciduous trees and shrubs such as willow (Salix), poplar (Populus), plane (Platanus), dogwood (Cornus), black locust (Robinia pseudoacacia), Osage orange (Maclura pomifera) and elderberry (Sambucus).
Ornamental shrubs propagated this way include forsythia (Forsythia), privet (Ligustrum), spirea (Spiraea), hydrangea (Hydrangea), viburnum (Viburnum), deutzia (Deutzia), weigela (Weigela), snowberry (Symphoricarpos), tamarisk (Tamarix), barberry (Berberis), euonymus (Euonymus) and some hibiscus. Woody climbers and vines include grape (Vitis), wisteria (Wisteria), honeysuckle (Lonicera), bittersweet (Celastrus), Boston ivy and Virginia creeper (Parthenocissus), and trumpet vine (Campsis).
Fruit and berry plants propagated from hardwood cuttings include figs (Ficus carica), currants and gooseberries (Ribes), quince (Cydonia oblonga), some plums (Prunus), blueberries (Vaccinium), pomegranates (Punica granatum) and mulberries (Morus). Hardwood cuttings are also used for many roses and some rose rootstocks.
Among narrow-leaved evergreens, yew (Taxus), juniper (Juniperus), arborvitae (Thuja) and false cypress (Chamaecyparis) are important examples. Some pines (Pinus), spruces (Picea) and other woody evergreens can also be propagated from mature stem material, although some are much more difficult to root than others.
The form of cutting used depends on the plant. Straight cuttings are the usual choice for readily rooted deciduous plants such as willow, poplar, forsythia, privet, grape, currants, gooseberries and figs, while heel and mallet cuttings retain older wood at their base and are useful for woody plants that root better when that older tissue remains attached.
When to Take Hardwood Cuttings
Take hardwood cuttings after the season’s growth has matured and the plant has entered dormancy. For deciduous plants, this period begins after leaf fall in autumn and continues through winter until the buds begin active growth in spring.
Late winter is especially convenient because hardwood propagation can be combined with winter pruning. Healthy stems that would otherwise be discarded can be selected and turned into new plants.
Narrow-leaved evergreens used for hardwood propagation are also normally cut during the dormant season, from late autumn through winter. Cuttings can be planted soon after they are taken or stored under refrigeration until planting conditions are suitable.
Selecting Suitable Hardwood Cutting Material
The quality of the stem used for a cutting has a major effect on whether it roots successfully. For ordinary straight hardwood cuttings, select healthy, vigorous stems produced during the previous growing season. These should be fully mature and woody rather than soft and green.
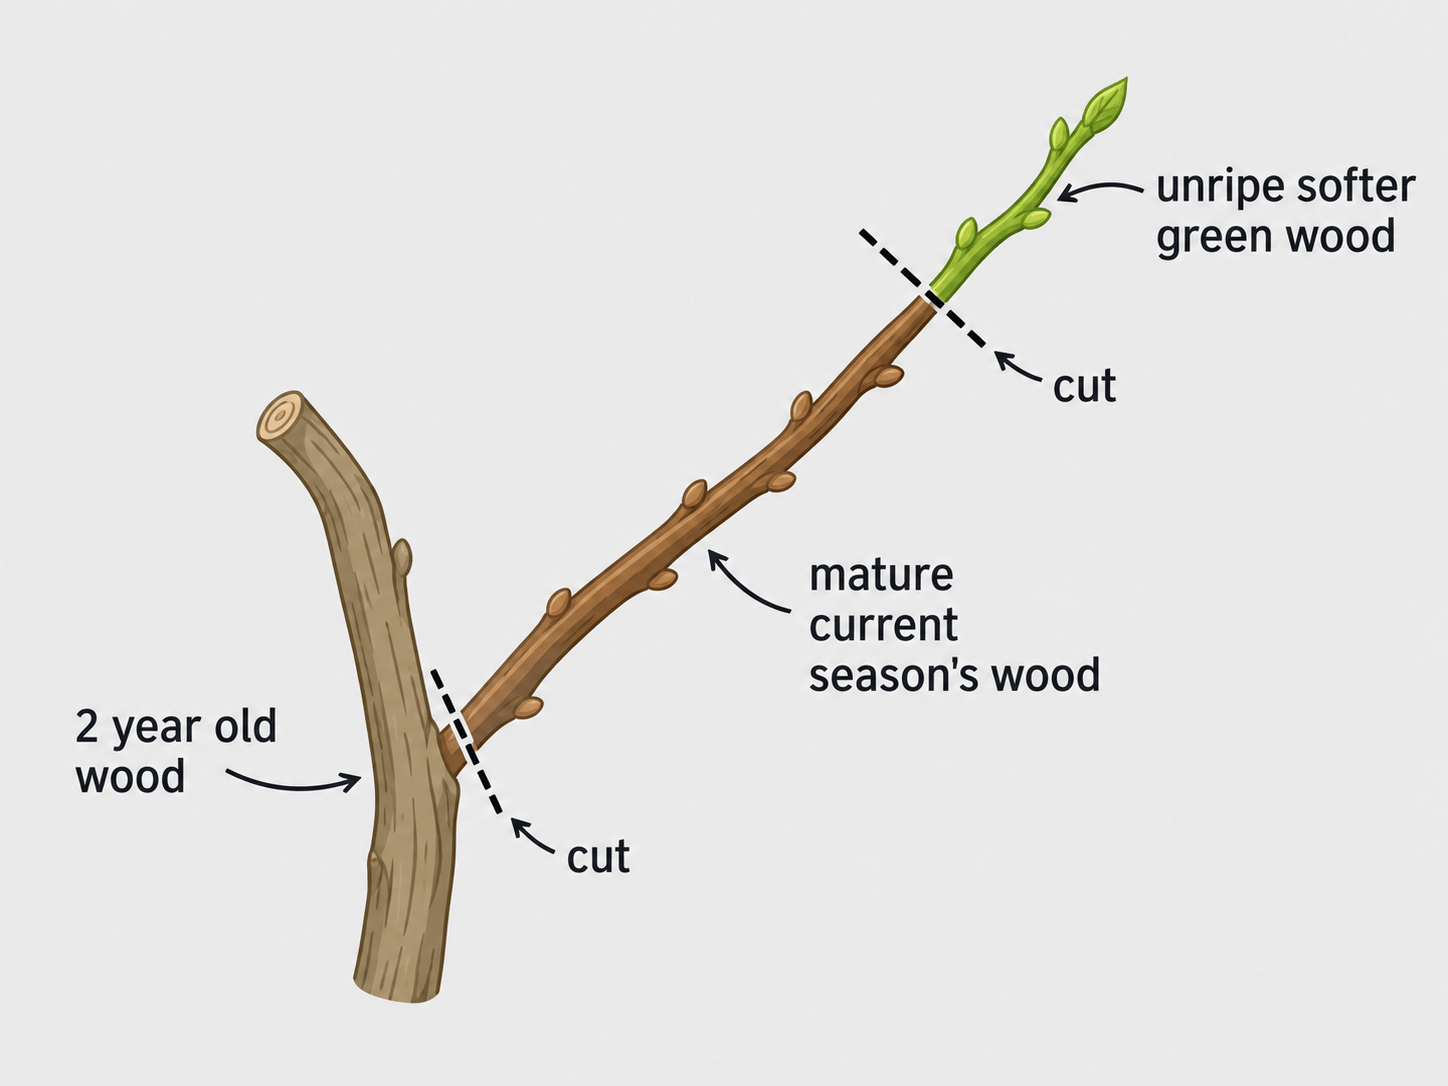
On a dormant deciduous plant, the previous season’s growth is usually smoother and younger-looking than the older branch from which it arose. The change to older wood can often be seen as a difference in bark colour, texture or stem thickness. Pencil-thick stems are suitable for many shrubs, vines and fruiting plants.
Where suitable material is available, the lower part of the previous season’s growth, close to where it joins the older wood, can make particularly useful propagation material. Basal sections of woody shoots can root more readily than younger growth farther towards the tip, and some plants also root better when a small amount of older wood is retained. Basal material also provides substantial woody tissue containing stored carbohydrate reserves that help support the cutting before roots become established. After a cutting is taken, auxin produced in the shoot is transported towards and accumulates at the lower end, where it helps trigger the formation of adventitious roots.
Avoid soft, immature shoot tips, weak or excessively thin growth, diseased or damaged stems, badly shrivelled wood, insect-damaged stems and short fruiting spurs where stronger vegetative growth is available. Healthy buds are important because these will produce the new shoots, so where possible choose vigorous vegetative growth rather than weak shoots dominated by flower buds. A new cutting needs to establish roots, stems and leaves before it can support flowers or fruit.
If the parent plant is grafted, take propagation material from above the graft union if the aim is to reproduce the named cultivar. Shoots growing from below the graft union belong to the rootstock, so a cutting taken from one of those shoots will produce another rootstock plant rather than the cultivar above it.
Understanding Buds and Nodes
Before preparing hardwood cuttings, identify the buds and nodes on the stem. A bud contains an undeveloped shoot or flower and is usually visible on dormant wood as a small raised structure on the stem.
The node is the point where a leaf and its associated bud formed during the growing season. After a deciduous leaf falls, its leaf scar remains beside the bud, while the length of stem between two nodes is the internode.
These points matter because new shoots grow from the buds, while new roots often develop from living tissues at or close to nodes and wounded parts of the stem. A useful hardwood cutting therefore contains several healthy nodes and buds rather than simply being a random length of woody stem.
Straight, Heel and Mallet Hardwood Cuttings
Hardwood cuttings are prepared in three main forms: straight cuttings, heel cuttings and mallet cuttings. The difference is not just the shape of the cutting, but whether older wood is retained at the bottom and, if so, how much.
A straight cutting contains only the mature stem being propagated. A heel cutting keeps a small piece of older wood attached to the base, while a mallet cutting retains a complete short section of older stem across the base.
Straight Hardwood Cuttings
A straight cutting is the standard and most widely used type. It consists of a section of mature stem without any of the older branch attached.
This is the normal method for many deciduous shrubs, fruiting plants and vines, including figs, grapes, currants, gooseberries, pomegranates, quince, willows, poplars, privet, forsythia, honeysuckle, spirea and red-twig dogwoods.
Straight cuttings are quick and economical to prepare because one long dormant stem can be divided into several separate cuttings. If a plant roots readily this way, there is no reason to remove older branches simply to make heel or mallet cuttings.
Heel Hardwood Cuttings
A heel cutting retains a small piece of older wood at its bottom end. It is useful for plants that root better when some older stem tissue remains attached, particularly certain narrow-leaved evergreen shrubs and conifers.
To make a heel cutting:
- Select a healthy side shoot growing from an older woody stem.
- Grasp the shoot close to its base and pull it downwards and away from the older branch rather than cutting it off cleanly.
- The shoot should tear away with a small strip of the older branch attached. This piece is the heel.
- Trim away any long, ragged tail of bark or wood, but leave the compact heel attached.
- Remove foliage from the part of the cutting that will be buried.
- Apply rooting hormone where required, then insert the heel and lower part of the cutting into the propagation medium.
The heel provides older wood at the rooting end and creates a relatively large wound, both of which are useful in plants that are slow or difficult to root from an ordinary straight cutting.
Mallet Hardwood Cuttings
A mallet cutting retains more older wood than a heel cutting. Instead of pulling a side shoot away from the parent branch, a short section of the older stem is cut out with the younger shoot still attached to it.
To make a mallet cutting:
- Select a healthy side shoot growing from an older woody stem.
- Cut through the older stem immediately above the point where the younger shoot joins it.
- Make a second cut immediately below the junction.
- Remove the side shoot with the short cross-piece of older stem still attached.
- Trim the older cross-piece to a practical size without removing it.
- Remove foliage from the part that will be buried.
- Apply rooting hormone where required, then bury the complete older cross-piece in the propagation medium.
Viewed from the side, the younger shoot forms the handle and the short piece of older stem forms the head, giving the cutting its mallet-like shape.
Why Use Heel or Mallet Cuttings?
Some woody plants root readily from one-year-old stem growth alone, so straight cuttings are simpler and make better use of the available propagation material. Other woody plants form roots more reliably when part of the older stem remains attached at the base, and heel and mallet cuttings provide this older wood while also creating a larger wounded area where roots can form.
They are particularly useful with narrow-leaved evergreens and conifers such as yews (Taxus), junipers (Juniperus), arborvitae (Thuja), false cypress (Chamaecyparis), crowberry (Empetrum) and twinflower (Linnaea borealis), as well as some other difficult-to-root woody plants.
A heel cutting uses only a small piece of older wood, so it consumes less material from the parent plant. A mallet cutting removes a larger section of the older branch and is used where that larger piece of mature basal wood is useful. The practical rule is to use straight cuttings for plants that root readily from ordinary stem sections, and heel or mallet cuttings where the plant is known to root better with older wood retained at the base.
How to Prepare Straight Hardwood Cuttings
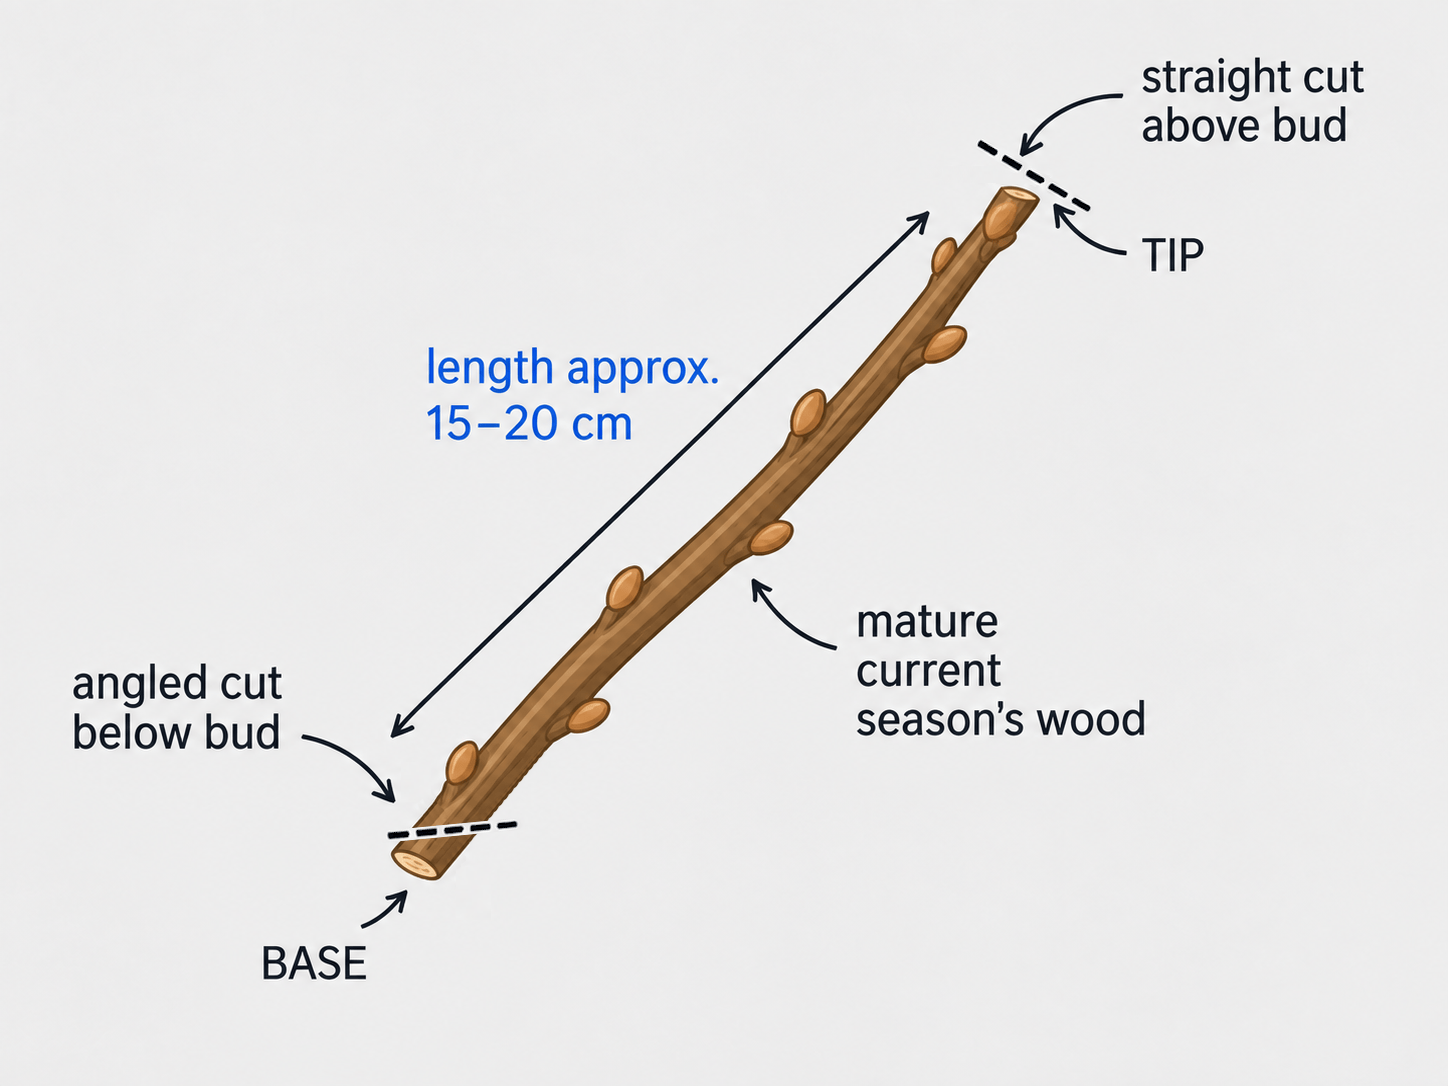
For many deciduous shrubs and fruiting plants, cuttings approximately 15–25 cm (6–10 in) long are a useful size. Some plants use longer cuttings, while live stakes used in revegetation can be much larger.
Hardwood cuttings are generally more substantial than many leafy cuttings because they initially have no functioning root system and must remain alive while new roots develop. During this period they depend heavily on carbohydrates and other reserves already stored in the woody stem. Longer stem sections contain larger carbohydrate reserves, which help keep the cutting alive until roots develop and provide material for the growth of those roots and new shoots.
Each cutting should contain several healthy buds. Use clean, sharp bypass secateurs or a propagation knife so the stem is cut cleanly rather than crushed.
Step 1 – Make the Bottom Cut
Find a healthy bud or node near the bottom of the section being used and make the bottom cut on an angle just below it. This is the end that will be inserted into the propagation medium, and the angled cut increases the exposed surface at the rooting end while also making the bottom of the cutting immediately recognisable.
Step 2 – Make the Top Cut
Move up the stem until the cutting contains several healthy buds and has reached the required length, then make the top cut straight across just above a bud. Using different cuts at each end makes the orientation obvious: straight at the top, angled at the bottom. This is useful when preparing or storing large numbers of dormant cuttings because bare stem sections can otherwise be surprisingly easy to plant upside down.
Keep Hardwood Cuttings from Drying Out
Dormant hardwood cuttings lose water much more slowly than leafy softwood cuttings, but they can still dry out. Once a stem has been removed from the parent plant, its root system can no longer replace the water lost from its tissues.
Do not leave freshly collected cuttings lying exposed to sun or drying wind while the planting area is prepared. If they are being planted immediately, keep them bundled together and covered with damp material, place them in a plastic bag, or wrap them in damp newspaper. Label each species and cultivar as soon as the cuttings are prepared because bare dormant stems from different plants can be very difficult to identify once they have been mixed together.
Storing Dormant Hardwood Cuttings
Hardwood cuttings collected in autumn or early winter can be stored until they are ready to be planted. The aim is to keep them cold enough to remain dormant while preventing them from drying out.
Store dormant hardwood cuttings in a refrigerator at 1–4°C (34–40°F). This keeps the buds dormant without exposing the stems to freezing conditions, so do not allow the cuttings to freeze or store them somewhere warm enough for the buds to begin growing.
For a household refrigerator, wrap the cuttings loosely in slightly damp paper towel and place them inside a sealed food-grade plastic bag. The paper should feel damp but should not drip or release water when squeezed. The damp paper maintains humidity around the stems while the bag prevents the dry circulating air inside the refrigerator from dehydrating them. Paper towel is particularly convenient in a refrigerator used for food because it is clean, disposable and does not introduce loose materials such as peat, coir, sphagnum moss, sand or wood shavings into the appliance; slightly damp newspaper can be used for larger bundles in the same way.
Bundle each species or cultivar separately, keep the tops facing the same direction, and label each bundle with the plant or cultivar name and the date collected. Check stored cuttings periodically: the stems should remain firm and dormant, and the paper towel should be replaced if it becomes excessively wet, dirty or mouldy. Remove any cutting showing obvious decay.
Do not store hardwood cuttings beside apples, pears or other ripening fruit, because ripening fruit releases ethylene gas that can damage dormant buds. Once planting conditions are suitable, remove the cuttings from refrigeration and plant them before the buds begin active growth.
Wounding Hardwood Cuttings
Some woody plants root more readily if the lower end of the cutting is lightly wounded before planting. To wound a cutting, use a sharp knife to remove a narrow strip of bark from one side of the bottom 2–3 cm (3/4–1 1/4 in) of the stem.
Make the cut shallow, removing the bark and exposing the living tissue immediately beneath it without carving deeply into the wood. This exposes the cambium and adjacent living vascular tissues at the end where roots need to develop. Cells in these tissues can respond to wounding by dividing and forming the primordia from which adventitious roots develop. Wounding also increases the area of living tissue that comes into contact with rooting hormone when hormone is used.
Heel and mallet cuttings already have a substantial wound at their base, although additional light wounding is sometimes used with difficult-to-root material. Plants that root readily without wounding do not need this extra step.
Using Rooting Hormone on Hardwood Cuttings
Commercial rooting hormones contain auxins that stimulate the formation of adventitious roots. The most commonly used active ingredient is indole-3-butyric acid (IBA).
Rooting hormone is useful for plants that are slow or difficult to root because it can increase the number of roots produced and improve the proportion of cuttings that establish successfully. Products are sold in different strengths, so use one intended for woody or hardwood cuttings and follow the manufacturer’s directions.
When using powdered rooting hormone:
- Pour a small quantity into a separate clean container.
- Dip the bottom of the cutting into the powder.
- Coat the freshly cut or wounded area.
- Tap the cutting gently to remove excess powder.
- Discard any powder left in the temporary container.
Do not repeatedly dip cuttings into the original container because moisture and pieces of plant tissue can contaminate the remaining product. Applying more rooting hormone does not produce more roots, and excessive auxin can suppress root formation instead of improving it. Plants such as grapes, willows, privet and many other easy-rooting deciduous shrubs normally root without hormone, while rooting hormone becomes more useful with plants that are slower to root, particularly many woody evergreen cuttings.
Willow water is a traditional rooting treatment made from young, actively growing willow stems. Willow tissues are natural sources of auxins and contain other biologically active compounds that can influence rooting. Unlike a commercial rooting hormone, however, a homemade willow extract has no standardised concentration, so its composition and strength vary with the willow material and the way it is prepared. It is therefore best regarded as a traditional biological rooting aid rather than as the equivalent of a commercial IBA product of known concentration.
For a home-made plant propagation preparation made from willow stems, see How to Make Home Made Plant Rooting Hormone – Willow Water.
Choosing a Propagation Medium
A hardwood cutting needs both water and oxygen while roots are forming. If the medium becomes too dry, the cutting can dehydrate before it establishes roots; if the medium stays saturated, there is too little air around the buried stem and new roots, increasing the risk of rot.
A good propagation medium therefore needs to retain moisture while still draining freely and maintaining plenty of air-filled pore space. It also needs enough structure to hold the cutting upright and should contain little or no fertiliser because the cutting cannot make effective use of fertiliser until roots have formed.
A commercial propagation mix works well. Suitable media can also include a good-quality potting mix for easy-rooting plants, coarse sand, coconut coir, a 1:1 mixture of peat and coarse perlite, or a 1:1 mixture of peat and coarse sand. Peat or coconut coir mixed with coarse perlite is particularly useful because the peat or coir holds moisture while the perlite maintains air spaces around the stem and developing roots.
Coarse sand is also used in hardwood propagation, particularly for narrow-leaved evergreen cuttings and nursery propagation beds. It provides physical support and can form a porous rooting medium when the particle size is appropriate, although it is considerably heavier than perlite-based mixes. Whatever medium is used, it must retain sufficient moisture without remaining waterlogged.
Propagating Hardwood Cuttings in Pots
Pots are useful when only a small number of cuttings are being propagated, when the garden soil drains poorly, or when the cuttings need to be kept in a protected position.
Use containers with unrestricted drainage holes and enough depth to hold approximately two-thirds of each cutting below the surface, leaving the upper three buds visible. Fill the containers with moist propagation medium.
If rooting hormone has been applied, make a planting hole with a dibber, pencil or narrow stick before inserting the cutting so the medium does not scrape the hormone from the base of the stem.
Insert the cutting with the angled bottom end pointing downwards and space multiple cuttings approximately 5 cm (2 in) apart in a larger propagation container. Firm the propagation medium gently around the cuttings and water thoroughly so it settles against the buried stems.
Where to Keep Potted Hardwood Cuttings
Place containers in a sheltered position with good light and protect them from drying winds, excessive heat, prolonged waterlogging and severe frost. Once tender new leaves begin expanding, also protect them from strong direct afternoon sun until the developing root system can supply enough water to support the foliage.
A cold frame or greenhouse provides a protected environment and can promote earlier root development by keeping the rooting zone warmer than cuttings left exposed to colder outdoor conditions. Adventitious-root initiation and development are strongly affected by root-zone temperature. Keeping the rooting medium moderately warm while the air remains cooler encourages root formation without promoting excessive early shoot growth. Bottom heat can be used where still faster or more reliable rooting is required.
Leafless hardwood cuttings do not normally need to be sealed inside plastic bags or kept under continuous mist in the way that leafy softwood cuttings do.
Cuttings that root successfully in containers over winter may be ready to separate and transplant in spring. Check that they have developed enough roots to withstand handling before separating them. Because container-grown roots can be moved with their rooting medium, they normally suffer less root disturbance than rooted cuttings that have to be dug from an outdoor nursery bed.
Propagating Deciduous Hardwood Cuttings in the Ground
Many leafless deciduous hardwood cuttings can be rooted directly in a nursery bed. Choose fertile, workable soil that drains well because the cuttings may remain there through an entire growing season while their roots and shoots develop.
Avoid sites where the soil remains saturated through winter. The soil needs to hold enough moisture to prevent the cutting drying out while still allowing oxygen to reach the buried stem and new roots.
The Slit-Trench Method
A slit trench provides a quick way to plant a row of dormant hardwood cuttings.
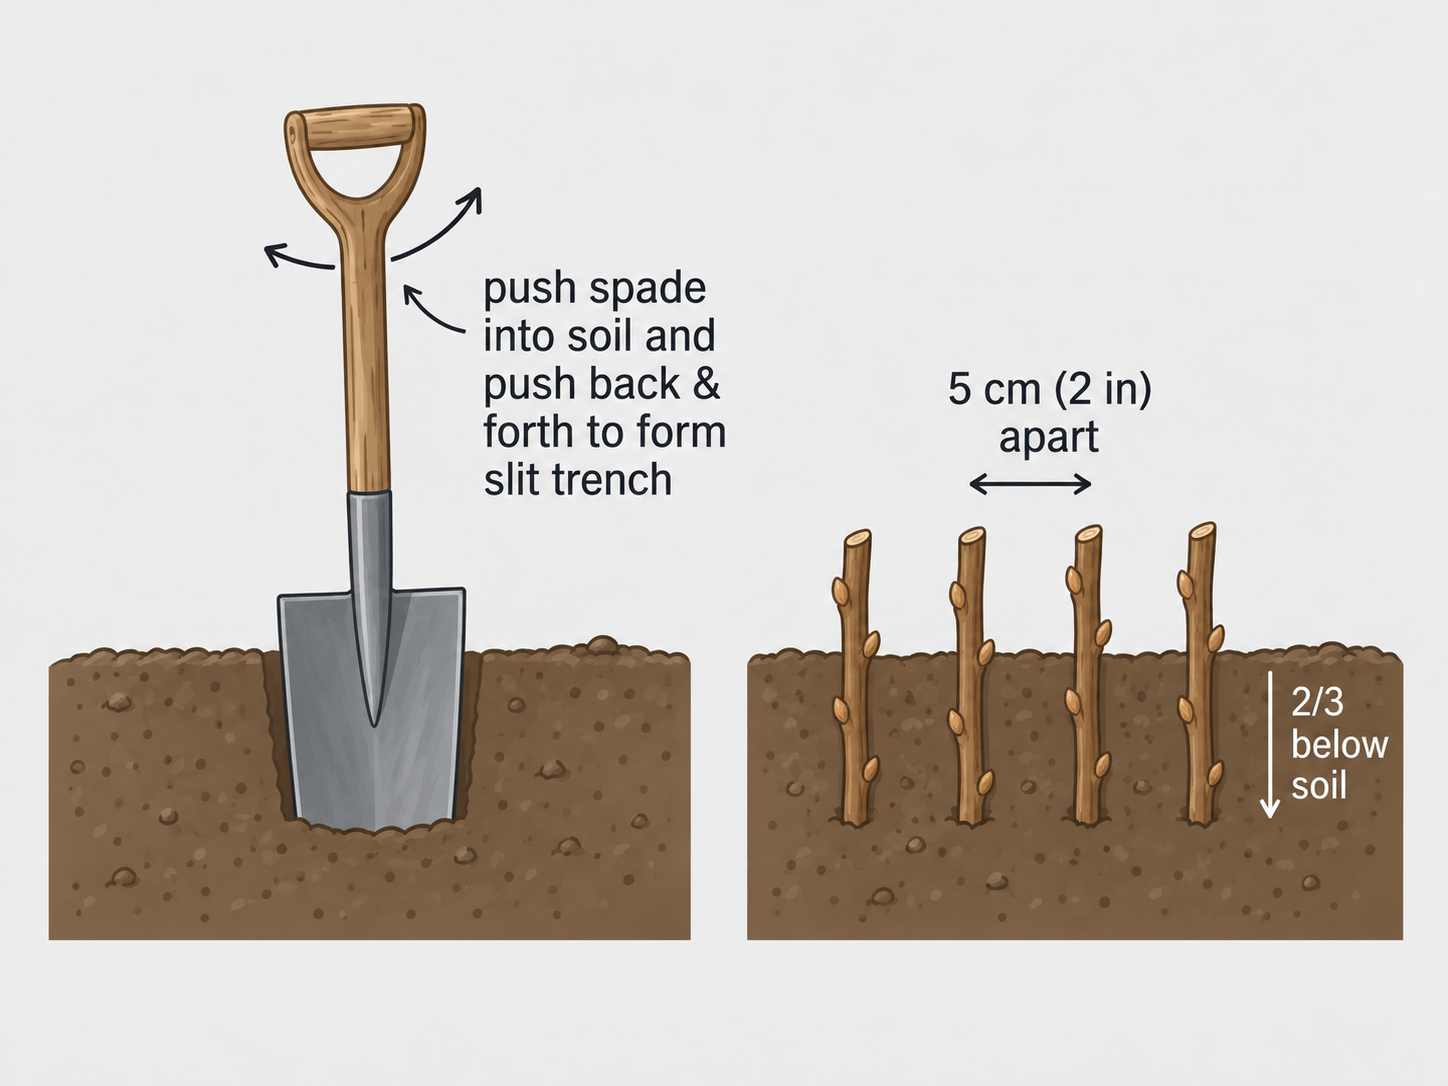
- Push a spade vertically into the soil and rock the handle backwards and forwards slightly to open a narrow slit. In heavy clay soil, place a layer of coarse sand or grit in the base of the trench around the rooting zone.
- Insert each cutting with its angled bottom end pointing downwards, with approximately two-thirds of its length below the soil and the upper three buds visible.
- Space the cuttings approximately 5 cm (2 in) apart along the trench. If planting several parallel trenches, leave approximately 30 cm (12 in) between rows.
- Press the soil firmly around the stems so there are no large air spaces around the buried sections.
- Water thoroughly to settle the soil around the cuttings. Because the cuttings are dormant and leafless, they lose little water during winter, while cool conditions and winter rainfall normally keep the soil damp for long periods. Check the bed during unusually dry weather and water if the soil begins to dry.
- Label each species and cultivar immediately.
- Leave the cuttings in the nursery bed through the following growing season. By the next autumn, successful cuttings should have developed a substantial root system and can be lifted after they become dormant again. Waiting until dormancy reduces water stress when the young plants are dug up and avoids disturbing their developing root systems during active shoot growth.
Keep the nursery bed free of weeds and water during dry weather.
How Deep Should Hardwood Cuttings Be Planted?
Dormant deciduous hardwood cuttings are normally planted quite deeply, with most of the stem below the surface and only the upper buds exposed. This keeps most of the cutting in a cool, moist environment, reduces drying, helps hold the stem firmly in place and puts several nodes into the rooting zone.
A useful working depth for the method described here is approximately two-thirds of the cutting below the surface, leaving the upper buds exposed.
Some plants are planted even more deeply. Fig cuttings can be buried with only the top bud exposed, while pomegranate hardwood cuttings are often planted with only 5–8 cm (2–3 in) above the surface and at least three nodes below ground.
The important point is to keep most of the dormant stem in the moist rooting zone while leaving viable buds above the surface to produce new shoots.
Watering Hardwood Cuttings
During winter, dormant leafless cuttings use very little water, so there is no reason to keep adding water when the soil or propagation medium is already moist. Potted cuttings need closer attention because the smaller volume of growing medium can dry more quickly than garden soil.
As temperatures rise and the buds begin growing in spring, water demand increases because the cutting may now have expanding leaves but only a small developing root system. Check the rooting medium regularly and water before it dries completely, but do not keep it permanently saturated or leave pots standing in water because roots need oxygen as well as moisture, and waterlogged media increase the risk of the base of the cutting rotting.
Propagating Narrow-Leaved Evergreens from Hardwood Cuttings
Hardwood propagation is not limited to leafless deciduous plants. Narrow-leaved evergreens such as yews (Taxus), junipers (Juniperus), arborvitae (Thuja) and false cypress (Chamaecyparis) are also propagated from mature dormant wood.
These cuttings retain foliage, so they continue losing water while roots are developing. Take mature dormant shoots from late autumn through winter. Straight cuttings are used for many species, while heel and mallet cuttings are useful where retaining older wood at the base improves rooting.
Remove needles or scale foliage from the lower portion of the cutting so no foliage is buried in the propagation medium. Wound the bottom of difficult-to-root cuttings where appropriate and apply a suitable rooting hormone before inserting them into a porous, well-drained rooting medium.
Coarse sand, perlite-based mixtures and other highly aerated media are useful because they hold the cuttings firmly without keeping the base waterlogged. Evergreen hardwood cuttings need more protection from drying than leafless deciduous cuttings because their foliage continues to lose water, so keep them protected from strong sun, dry air and wind while roots are forming.
Bottom heat can improve rooting in many evergreen hardwood cuttings. Warming the rooting medium encourages root activity while cooler air above the propagation bench helps prevent excessive shoot growth.
Choosing Straight, Heel or Mallet Cuttings for Evergreens
Many low-growing junipers, arborvitae, false cypress and yews can be propagated from mature straight cuttings, while some junipers and other difficult-to-root evergreens respond better when older wood is retained at the base.
Heel cuttings provide a small piece of this older wood, while mallet cuttings retain a larger cross-section. Yews are commonly propagated using heel or mallet cuttings, and similar methods are used for other woody evergreens such as crowberry and twinflower. These forms are used because the plant roots better from that kind of basal material, not because they are simply alternative shapes of cutting.
What Happens After a Hardwood Cutting Is Planted?
A hardwood cutting has no roots when it is first planted, but its stem tissues are still alive. The stem contains stored water, carbohydrates and other reserves accumulated before dormancy.
After planting, living cells around the wounded base, the nodes and the vascular tissues become active. New adventitious roots form inside the stem and eventually emerge through the outer tissues.
A pale or swollen mass of wound tissue called callus may also form around the bottom cut. Callus is part of the wound-healing response, but it is not a root system, so a cutting can produce callus before any roots appear. Roots may emerge through or beside this callused tissue, around nodes, or from other living tissues near the wounded bottom of the stem.
New Shoots Do Not Prove That Roots Have Formed
One of the easiest mistakes to make with hardwood cuttings is assuming they have rooted as soon as the buds begin growing. A dormant stem already contains stored water and carbohydrates, and these reserves can support bud break and several centimetres of new shoot growth before a useful root system exists.
A cutting can therefore produce healthy-looking leaves while still having very few roots or none at all. If the new shoot uses the stored water in the stem faster than the developing roots can replace it, the leaves can suddenly wilt.
Do not pull newly sprouted cuttings out of the propagation medium to check them because the first new roots are fine and brittle and can easily be torn off.
How Long Do Hardwood Cuttings Take to Root?
Rooting speed depends on the plant, the condition of the cutting, temperature and the rooting environment. Easy-rooting plants under favourable conditions can begin forming roots within several weeks, while outdoor cuttings taken during winter may remain apparently inactive until temperatures rise in spring.
There is usually no reason to disturb cuttings in a nursery bed as soon as the first roots appear. Allowing them to remain in place through the growing season gives them time to develop a much stronger root system before transplanting, while difficult-to-root evergreen hardwood cuttings can take considerably longer than easy-rooting deciduous plants.
How to Check Whether Hardwood Cuttings Have Rooted
Once a cutting has had enough time to begin rooting, hold the stem gently near its base and apply a very light upward pull. A rooted cutting will resist movement because the new roots are anchoring it into the surrounding medium, but do not repeatedly tug at cuttings because newly formed roots are easily damaged.
With potted cuttings, roots may eventually become visible through the drainage holes, and a well-rooted cutting will also begin to hold the propagation medium together when it is carefully removed from the pot. The cutting is ready to move when it has developed enough roots to support its new shoot and survive handling, not simply when the first root appears.
Potting Up Rooted Hardwood Cuttings
Water the propagation container before removing rooted cuttings because moist growing medium separates more easily and is less likely to tear fine new roots. If several cuttings are growing together, loosen the medium around the roots instead of pulling the stems apart.
Transfer each rooted cutting into its own pot filled with good-quality potting mix. Spread the roots naturally through the new container rather than forcing them into a small hole, then fill around them with potting mix and firm it gently.
Water thoroughly after potting and keep newly potted plants protected from severe heat, direct afternoon sun and drying winds until their roots begin growing into the new mix. Once active growth resumes, gradually move them into the normal light conditions required by that species.
Hardening Rooted Evergreen Cuttings
Evergreen hardwood cuttings that have been rooted under protected conditions need to be acclimatised before being exposed to normal outdoor conditions. Increase ventilation gradually and reduce protection from humidity over time rather than moving freshly rooted plants directly from a protected propagation area into hot sun or strong dry winds.
Once the plants have developed active roots and new shoot growth, pot them individually and gradually move them into their normal outdoor growing conditions.
Growing Hardwood Cuttings Through Their First Season
The purpose of the first growing season is to build a strong root system and vigorous young plant. Keep newly rooted plants adequately watered, especially during warm or dry weather, because their root systems are still much smaller than those of established plants.
Keep nursery rows free of weeds so the young plants do not have to compete for water and nutrients, and move container-grown plants into larger pots when their roots fill the original container.
If a newly propagated fruiting plant produces flowers or young fruit, remove them during the establishment period because the young plant is better off putting its limited resources into roots, stems and leaves rather than trying to carry a crop. Hardwood cuttings established in a nursery row are normally left there through their first growing season.
When to Transplant Hardwood Cuttings
Ground-grown deciduous hardwood cuttings are best moved after they have completed their first growing season and become dormant again. Dig around the plant widely enough to retain as much of the root system as possible, lift it carefully and replant it promptly so the roots do not dry out.
Container-grown plants can be transplanted once they have developed a strong root system that holds the potting medium together and supports the growing shoot. Cuttings rooted successfully under protected conditions over winter may reach this stage by spring because they can develop roots earlier than cuttings left in a cold outdoor nursery bed.
Allowing ground-grown plants to establish for a full season before moving them generally produces a stronger plant with a much larger root system and reduces the amount of active growth present when the roots are disturbed.
Examples of Plants Propagated from Straight Hardwood Cuttings
The same general straight-cutting method can be used for many plants, but the cutting length, planting depth and number of buds differ between species.
Figs
Take dormant fig cuttings from healthy one-year-old wood during winter and prepare pieces approximately 20–25 cm (8–10 in) long. Discard weak, soft or poorly matured shoot tips and plant the cuttings deeply in a nursery row or deep container so that only the upper bud remains above the soil or propagation medium.
Keep the rooting zone moist as growth begins. Figs root readily from hardwood cuttings and can develop into strong young plants during their first growing season.
Pomegranates
Take approximately 25 cm (10 in) of healthy one-year-old pomegranate wood in late autumn or winter, using stems around 6–13 mm (1/4–1/2 in) thick.
Plant the cutting deeply so that only approximately 5–8 cm (2–3 in) remains above the surface and at least three nodes are below the soil or propagation medium. Pomegranate cuttings can be rooted in containers or directly in a nursery row, and rooting hormone and bottom heat can improve rooting although the plants can also root without them.
Mulberries
Take mulberry hardwood cuttings while the plant is dormant. Select healthy mature stems produced during the previous growing season, remove weak shoot tips and damaged material, and prepare standard straight cuttings containing several healthy buds.
Bury most of each cutting in a nursery bed or propagation container, keep the rooting zone moist as the buds begin growing and allow the young plants to develop a strong root system before transplanting them.
Quince
Take healthy one-year-old quince wood during dormancy and prepare cuttings approximately 20–25 cm (8–10 in) long with several viable buds.
Plant them deeply in a nursery bed or propagation container and keep the rooting zone moist while roots develop. Allow the rooted plants to grow through the following season before transplanting them during dormancy.
Currants
Currants are among the easiest fruiting shrubs to propagate from dormant hardwood cuttings. Take healthy one-year-old stems during late autumn or winter and prepare cuttings at least 20 cm (8 in) long.
Plant most of each cutting below the surface in a nursery bed, leaving one or two healthy buds exposed. Rooting hormone is unnecessary for routine currant propagation, and the nursery bed should be kept moist and weed-free while the plants establish.
Blackcurrants, redcurrants, white currants and golden currants can all be propagated this way.
Gooseberries
Take gooseberry cuttings from healthy one-year-old dormant wood and prepare pieces approximately 15–20 cm (6–8 in) long with several healthy buds.
Plant at least half of the cutting below the surface in a nursery bed or container. Gooseberries establish more slowly than currants, so leave the cuttings undisturbed while a substantial root system develops and grow them through their first season before moving them.
How to Propagate Grapevines from Hardwood Cuttings
Grapevines are particularly well suited to hardwood propagation. Choose healthy one-year-old canes that grew during the previous season and have matured into firm woody stems.
Use well-ripened canes around pencil thickness or greater and avoid thin, weak tips or excessively vigorous sections with very long spaces between buds. Prepare grape cuttings with 3–4 healthy buds, remove tendrils and small lateral shoots, and keep track of the original top and bottom of each section.
Plant the cuttings in a nursery bed or deep container with the lower buds below the surface and two healthy buds remaining above the rooting medium. Firm the soil or propagation medium around the cutting and water thoroughly.
Grapevines root readily from dormant hardwood cuttings and do not require rooting hormone for routine propagation. Several grape cuttings can be rooted together in a larger container. Separate them into individual pots after they have begun producing new leaves in spring and have developed enough roots to withstand handling.
Grow the young vines separately for their first year so they can develop strong root systems. Transplant them to their permanent positions the following spring while they are dormant.
How to Propagate Grapevines Using Vine-Eye Cuttings
Grapevines can also be propagated from very short pieces of mature cane containing a single bud. These are called vine-eye cuttings and are useful when only a small amount of valuable propagation material is available because one cane can be divided into many more individual cuttings.
For the vertical vine-eye method, prepare a section of dormant cane containing one healthy bud by making the upper cut approximately 6 mm (1/4 in) above the bud and leaving approximately 5 cm (2 in) of cane below it. Insert the lower section into the propagation medium so the bud remains at or just above the surface.
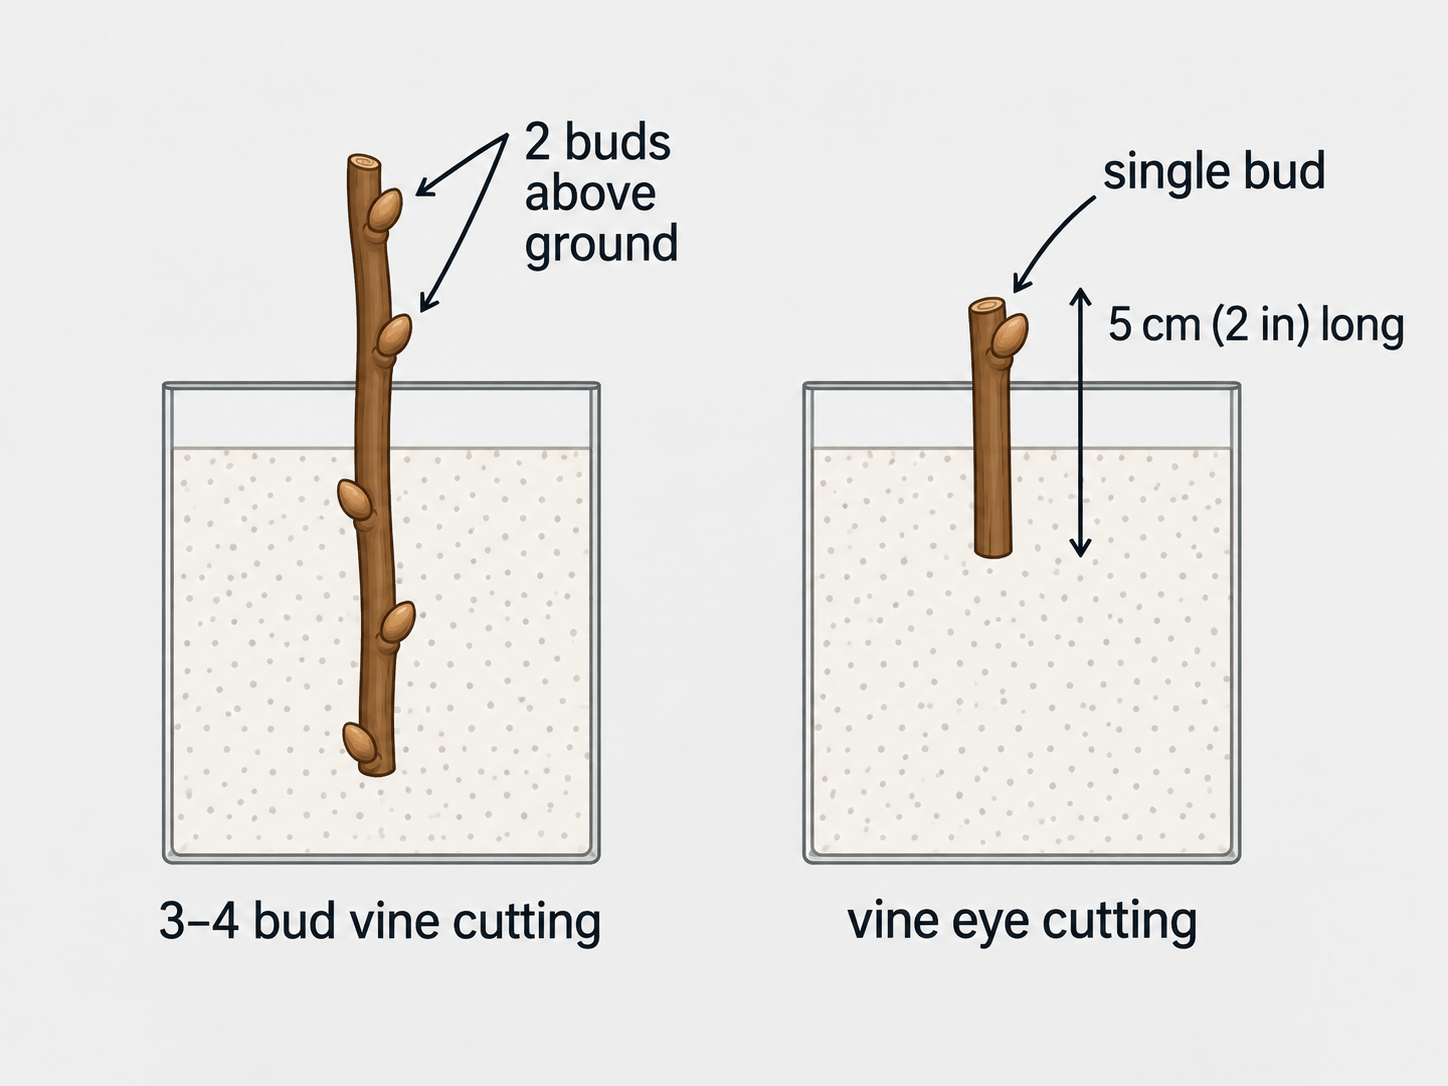
A vine-eye cutting contains much less woody stem than a conventional 3–4-bud cutting and therefore carries fewer stored reserves. It is consequently less robust during establishment and requires more careful control of moisture and propagation conditions.
In a direct 2025 comparison, conventional 4–5-node grape hardwood cuttings produced substantially longer shoots, more leaves, longer roots and almost four times as many roots as single-node cuttings. Overall rooting was also higher in the conventional hardwood cuttings, at 95.6% compared with 83.7% for the single-node cuttings under the conditions tested.
The advantage of vine-eye cuttings is that they make very efficient use of propagation material. Because each cutting uses only one bud, a limited length of valuable cane can be divided into many more individual propagation units than would be possible with conventional multi-bud cuttings.
Single-node grape cuttings can also be rooted horizontally under controlled propagation conditions. In the 2025 study, horizontal single-node cuttings rooted earlier and more effectively than vertically planted single-node cuttings. This is an alternative single-node propagation system and does not replace the vertical vine-eye method described above.
How to Propagate Kiwifruit from Hardwood Cuttings
Kiwifruit can be propagated from dormant canes removed during winter pruning. Take mature canes during winter before sap flow begins and prepare cuttings approximately five to six nodes long.
Keep the original top and bottom clearly identified because dormant kiwifruit cane can be difficult to orient once it has been cut into sections. Insert the lower one or two nodes into a deep container filled with suitable propagation or potting mix, and lightly wound and treat the lower portion with rooting hormone where required to encourage root formation.
Water thoroughly and allow the cutting to grow through its first season in the container. If both male and female kiwifruit vines are being propagated, label the cuttings as soon as they are collected because once dormant cuttings from different vines have been mixed together, their sex cannot be determined from the bare stems.
Examples of Heel and Mallet Cutting Applications
Heel and mallet cuttings are particularly useful with woody plants that benefit from retaining older wood at the base.
Yews
Yews (Taxus spp.) can be propagated from mature stem cuttings, including heel and mallet cuttings that retain older basal wood. Remove foliage from the part of the cutting that will be buried, treat the base with rooting hormone and insert it into a well-aerated medium such as coarse sand or a peat-perlite mixture, keeping the foliage protected from drying while roots develop.
Junipers
Many junipers can be propagated from hardwood cuttings. Low-growing forms often root readily from straight cuttings, while some other junipers root more successfully from material containing older basal wood.
Heel cuttings provide a simple way to retain this older tissue. Pull a healthy side shoot downward from an older branch so a small heel remains attached, trim the heel neatly, remove foliage from the section that will be buried, apply rooting hormone where required and insert the cutting into a porous propagation medium.
Arborvitae and False Cypress
Arborvitae (Thuja) and false cypress (Chamaecyparis) can also be propagated from mature hardwood material. Straight cuttings are commonly used, while heel cuttings can be used where retaining some older wood improves rooting.
Remove foliage from the buried portion, apply rooting hormone where required and use a well-drained propagation medium.
Crowberry and Twinflower
Crowberry and twinflower are further examples of woody plants propagated from one-year-old growth with older basal wood retained. The older wood can be retained as a small heel or as a larger mallet section, depending on the propagation method used for the plant.
Hardwood Cuttings Used as Live Stakes
Hardwood propagation can also be carried out on a much larger scale. Plants that root very readily from dormant stems, particularly willows and poplars, can be propagated from large cuttings planted directly where the new plants are needed. These are known as live stakes.
Live stakes are used for revegetation, streambank stabilisation, erosion control and establishing woody vegetation without first growing plants in nursery containers. A practical live stake may be approximately 45–75 cm (18–30 in) long and 1.3–3.8 cm (1/2–1 1/2 in) thick, although much larger poles are used in restoration work.
Collect the stems while the plant is dormant, remove side branches and keep the original top and bottom clear. Insert a substantial portion of the stake into moist soil while leaving viable buds above ground. If the soil is firm, make a pilot hole with a metal rod first so the bark is not stripped from the cutting as it is inserted.
Firm the soil around the stake so there are no large air pockets. The same process occurring in a small hardwood cutting then takes place on a larger scale: adventitious roots grow from the buried section while shoots emerge from viable buds above the soil.
Common Problems When Propagating Hardwood Cuttings
The Cutting Shrivels and the Bark Becomes Wrinkled
A shrivelled cutting has lost too much water. This can happen because the cutting dried out before planting, because stored cuttings were kept too dry, or because the rooting medium was allowed to dry excessively.
Keep freshly collected material protected from sun and wind, store it under moist conditions and do not allow the rooting zone to dry completely.
The Bottom of the Cutting Turns Brown, Black or Soft
Soft, dark tissue at the bottom of the cutting indicates decay, and the common cause is excessive moisture combined with poor aeration. Use a free-draining propagation medium, keep drainage holes open and do not leave pots standing permanently in water; in the ground, avoid nursery beds that remain waterlogged through winter.
Buds Open but the New Shoots Later Wilt
The buds can begin growing using water and carbohydrates already stored in the stem before a useful root system has formed. If the new leaves begin losing water faster than the developing roots can replace it, the shoots wilt.
Keep the rooting zone moist and protect new growth from hot sun and drying wind while the roots continue developing.
Callus Forms but No Roots Appear
Callus is wound-healing tissue, not a root system. Its presence shows that the stem is alive and responding to the wound, but the cutting still needs to form adventitious roots, so leave it undisturbed while rooting continues.
The Cutting Remains Dormant While Others Begin Growing
Not every cutting begins growing at the same time. A living dormant cutting should remain firm rather than becoming dry, brittle or rotten, and if necessary a tiny area of bark can be lightly scratched to check for green living tissue underneath.
Leave viable cuttings in place even if neighbouring cuttings have already started growing.
The Cutting Pulls Out Easily
The cutting has not yet developed enough roots to anchor itself. If it has been disturbed, carefully put it back into place and leave it alone because repeatedly pulling cuttings out to check them can break the first roots as they form.
Evergreen Cuttings Dry from the Tips
Evergreen hardwood cuttings retain foliage and therefore continue to lose water while roots develop. Protect them from strong sun, low humidity and drying winds, keep the rooting medium moist without saturating it, and maintain sheltered conditions until roots are established.
The Cutting Was Planted Upside Down
Bare dormant stems can be surprisingly difficult to orient after they have been cut into sections and bundled together. Keep the tops aligned while preparing and storing the cuttings, make the top and bottom cuts visibly different, and always plant the original bottom end into the propagation medium.
Turning Winter Prunings into New Plants
Hardwood propagation makes useful planting material from stems that are often already available during winter pruning. The method is straightforward once the correct type of cutting has been chosen: select healthy mature wood at the correct stage of dormancy, decide whether the plant is best propagated from a straight, heel or mallet cutting, and protect the material from drying while it is prepared.
Prepare the cutting with a clearly identifiable top and bottom, wound the base and apply rooting hormone where those treatments improve rooting, then place the cutting into a moist, well-aerated propagation medium and leave it undisturbed while roots develop.
In the pot and slit-trench methods described here, approximately two-thirds of the cutting is buried and the upper three buds remain above the surface. With narrow-leaved evergreens, healthy foliage is retained above the medium while foliage on the buried portion is removed.
For very easy-rooting plants such as willows and poplars, the same principle can be extended from small nursery cuttings to large live stakes planted directly into the ground.
Take more cuttings than the number of plants required because not every cutting will establish. Those that root successfully can be grown through their first season until they have developed strong root systems and are ready to transplant.
Instead of discarding suitable winter pruning material, use it to grow more plants.
Happy propagating!
References
- Arab, A., Alizadeh, M., & Seifi, E. (2025). Enhancing grapevine (Vitis vinifera L.) mass propagation: Single-node cuttings vs. traditional approaches. Journal of Applied Horticulture, 27(2), 254–259. https://doi.org/10.37855/jah.2025.v27i02.47
- Braun, L. C., & Wyse, D. L. (2019). Optimizing IBA concentration and stem and segment size for rooting of hybrid hazelnuts from hardwood stem cuttings. Journal of Environmental Horticulture, 37(1), 1–8. https://experts.umn.edu/en/publications/optimizing-iba-concentration-and-stem-and-segment-size-for-rootin/
- Dumroese, R. K., Luna, T., & Landis, T. D. (Eds.). (2009). Nursery manual for native plants: A guide for tribal nurseries. U.S. Department of Agriculture, Forest Service. https://research.fs.usda.gov/download/treesearch/33057.pdf
- Iowa State University Extension and Outreach. (2024). Propagation of trees, shrubs, and vines from hardwood cuttings. https://yardandgarden.extension.iastate.edu/how-to/propagation-trees-shrubs-and-vines-hardwood-cuttings
- Kansas State University Research and Extension. (2020). Grapes (MF635). https://bookstore.ksre.k-state.edu/download/grapes_MF635
- Kumar, M. G. N. (n.d.). Propagating shrubs, vines, and trees from stem cuttings (PNW152). Washington State University Extension. https://pubs.extension.wsu.edu/product/propagating-deciduous-and-evergreen-shrubs-trees-vines-with-stem-cuttings/
- Montana State University Extension. (2026). Cloning at home. https://www.montana.edu/extension/lila_extn/winter2026/cloningathome.html
- New Mexico State University Cooperative Extension Service. (n.d.). Propagation of grape vine cuttings: A practical guide (Guide H-322). https://pubs.nmsu.edu/_h/H322/
- North Carolina State University Extension. (2021). Extension gardener handbook: 13. Propagation. https://content.ces.ncsu.edu/extension-gardener-handbook/13-propagation
- Oregon State University Extension Service. (n.d.). Growing table grapes. https://extension.oregonstate.edu/catalog/ec-1639-growing-table-grapes
- Oregon State University Extension Service. (2021). Growing kiwifruit in your home garden. https://extension.oregonstate.edu/catalog/em-9322-growing-kiwifruit-your-home-garden
- Pennisi, B. V., Dorn, S., & Sawyer, S. (2023). Starting plants from cuttings for the home gardener (Bulletin 1553). University of Georgia Cooperative Extension. https://extension.uga.edu/publications/detail.html?number=B1553
- University of Alaska Fairbanks Agricultural and Forestry Experiment Station. (n.d.). Propagation of woody plants. https://www.uaf.edu/afes/places/gbg/research/files/pdfs/1985.Holloway.prop_.woody_.plants.pdf
- University of California Agriculture and Natural Resources. (n.d.). Cuttings. https://ucanr.edu/site/uc-marin-master-gardeners/cuttings
- University of Colorado Extension Service. (1938). Plant propagation. https://hermes.cde.state.co.us/islandora/object/co%3A8892/datastream/OBJ/download/Plant_propagation.pdf
- University of Florida Institute of Food and Agricultural Sciences. (n.d.). Cutting types: Hardwood cuttings. https://propg.ifas.ufl.edu/05-cuttings/02-types/02-cuttingtypes-hardwood.html
- University of Florida Institute of Food and Agricultural Sciences. (n.d.). Cutting types: Heel cuttings. https://propg.ifas.ufl.edu/05-cuttings/02-types/03-cuttingtypes-heel.html
- University of Georgia Cooperative Extension. (n.d.). Home garden figs. https://extension.uga.edu/publications/detail.html?number=C945
- University of Georgia Cooperative Extension. (n.d.). Pomegranate production. https://extension.uga.edu/publications/detail.html?number=C997
- University of Minnesota Extension. (n.d.). Planting and transplanting trees and shrubs. https://extension.umn.edu/garden-and-home/yard-and-garden/gardening-in-minnesota/planting-and-transplanting-trees-and-shrubs
- U.S. Department of Agriculture, Forest Service. (n.d.). Balsam poplar. In Silvics of North America. https://research.fs.usda.gov/silvics/balsam-poplar
- U.S. Department of Agriculture, Forest Service. (2025). Tropical nursery manual: A guide to starting and operating a nursery for native and traditional plants. https://www.fs.usda.gov/rm/pubs_series/wo/wo_ah732.pdf
- U.S. Department of Agriculture, Natural Resources Conservation Service. (2019). Propagation of woody plants by dormant hardwood cuttings (Plant Materials Technical Note MT-29, Rev. 1). https://www.nrcs.usda.gov/plantmaterials/mtpmctn13539.pdf
- U.S. Department of Agriculture, Natural Resources Conservation Service. (2007). Hardwood cuttings: Slips, whips, live stakes, poles, and posts. https://www.nrcs.usda.gov/plantmaterials/orpmctn6826.pdf
- University of Wisconsin–Madison Division of Extension. (n.d.). Extending the garden season. https://hort.extension.wisc.edu/articles/extending-garden-season/