
Aesthetic garden design is about creating visually harmonious and engaging outdoor spaces by carefully balancing elements such as color, texture, form, and scale. A successful garden draws the eye, evokes emotion, and creates a sense of flow and order. This approach to design focuses on the artistic side of gardening, where the arrangement of plants, structures, and materials works together to create a cohesive and pleasing visual experience.
This article outlines ten core principles of aesthetic garden design—unity, balance, proportion, rhythm, color, texture, form, line, focal points, and depth—that serve as a foundation for creating visually compelling gardens. Each principle is explained with practical examples to help you understand how to apply them effectively in your own garden.
The second part of the article explores the distinction between aesthetic and functional garden design, highlighting how aesthetic design emphasizes visual harmony and artistic expression, while functional design prioritizes ecological balance and sustainability. Understanding how these two approaches differ—and how they can complement each other—can help you create a garden that is both beautiful and resilient.
This is a very long, detailed and comprehensive article, which may be easier to navigate using the table of contents below, or the page number links for each section at the bottom of the page:
Table of Contents
- Key Principles for Creating Unity and Harmony
- 1. Repetition of Elements
- 2. Consistency in Materials
- 3. Unifying Plant Types
- 4. Transition and Flow
- Types of Balance in Garden Design
- 1. Symmetrical Balance
- 2. Asymmetrical Balance
- 3. Radial Balance
- 4. Visual Weight and Scale
- 5. Balancing Hardscape and Softscape
- Key Principles for Achieving Proportion and Scale
- 1. Plant Height and Mass
- 2. Path and Bed Width
- 3. Layering Heights
- 4. Scale of Decorative and Structural Elements
- Key Principles for Creating Rhythm and Repetition
- 1. Repetition of Plant Forms
- 2. Color Echoing
- 3. Path and Border Patterns
- 4. Structural Repetition
- 5. Texture and Material Repetition
- Key Principles for Using Color Effectively
- 1. Analogous Colors
- 2. Complementary Colors
- 3. Monochromatic Color Schemes
- 4. Seasonal Color Changes
- 5. Foliage Color and Texture
- 6. Transition and Flow
- Fine vs. Coarse Texture
- Combining Textures for Visual Interest
- Material Texture
- Light and Shadow
- Seasonal Texture Changes
- Using Texture to Create Mood
- Practical Examples
- Key Types of Plant Forms
- 1. Upright and Vertical Forms
- 2. Rounded and Mounded Forms
- 3. Weeping Forms
- 4. Horizontal and Spreading Forms
- 5. Architectural and Structural Forms
- 6. Irregular and Naturalistic Forms
- Combining Plant Forms for a Cohesive Look
- Form in Hardscaping and Garden Structures
- Types of Lines in Garden Design
- 1. Straight Lines
- 2. Curved Lines
- 3. Diagonal Lines
- 4. Zig-Zag or Broken Lines
- 5. Implied Lines
- Combining Line Types for a Balanced Design
- Types of Focal Points
- 1. Specimen Trees and Shrubs
- 2. Statues and Sculptures
- 3. Water Features
- 4. Architectural Structures
- 5. Contrasting Colors and Textures
- 6. Lighting as a Focal Point
- Creating Balance with Multiple Focal Points
- Key Techniques for Creating Perspective and Depth
- 1. Layering Plants
- 2. Framing
- 3. Vanishing Points
- 4. Overlapping Plants and Objects
- 5. Changes in Elevation
- 1. Start with a Strong Structural Framework
- 2. Establish a Cohesive Color Palette
- 3. Balance and Proportion Across the Space
- 4. Incorporate Rhythm and Repetition
- 5. Layer Texture and Height
- 6. Adapt to Your Site and Growing Conditions
The Differences Between Aesthetic and Functional (Ecological) Garden Design
- 1. Goal and Purpose
- 2. Plant Selection
- 3. Design Structure and Form
- 4. Maintenance and Resource Use
- 5. Environmental Impact
- 6. Human Experience and Interaction
- 7. Integration of Aesthetic and Functional Design
The following sections describe the ten aesthetic design principles. Each ones begins with a brief summary of the principle and short list of descriptive points. This is followed by a more detailed explanation along with practical examples.
1. Unity and Harmony

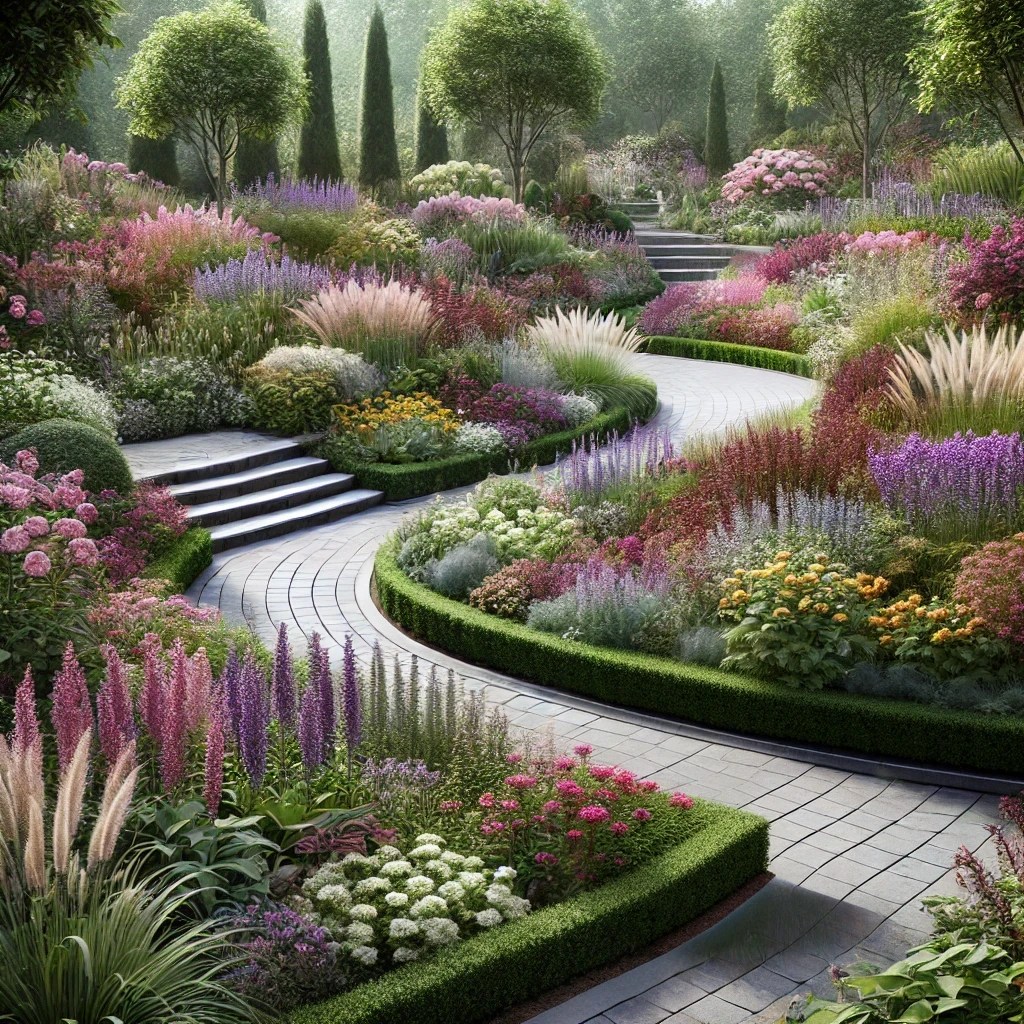
A garden should feel like a unified whole rather than a collection of disconnected elements. Unity and harmony are achieved when all the components of a garden—plants, hardscaping, colors, and textures—work together in a consistent and cohesive way. When a garden is unified, it creates a sense of calm and order that allows the eye to flow naturally from one area to another.
- Repetition of Elements: Repeating similar plants, colors, textures, or forms throughout the garden helps tie the design together. For example, using a recurring color scheme (such as shades of green and purple) or repeating the same type of shrub along a pathway reinforces visual cohesion.
- Consistency in Materials: Hardscaping elements (like paving stones, fences, and trellises) should share similar textures and colors to avoid visual clutter. For instance, using natural stone throughout a garden instead of mixing brick and wood helps maintain consistency.
- Unifying Plant Types: Grouping plants with similar foliage, growth habit, or bloom time creates visual unity. Combining ornamental grasses with perennials that share complementary textures and forms helps the garden look intentional rather than haphazard.
Unity and harmony are the foundation of a well-designed garden. A garden should feel like a unified whole rather than a collection of disconnected elements. When a garden is unified, all the components—plants, hardscaping, colors, textures, and structures—work together in a consistent and cohesive way. This creates a sense of order and balance that allows the eye to flow naturally from one area to another, giving the garden a sense of completeness and tranquility.
Unity is achieved by repeating patterns, forms, and colors throughout the garden, while harmony comes from ensuring that all these elements complement each other rather than competing for attention. A garden that achieves both unity and harmony feels intentional and balanced, where no single element stands out awkwardly or disrupts the overall flow.
A unified garden is easier to experience and appreciate because the eye isn’t distracted by conflicting shapes, colors, or textures. Instead, the elements guide the viewer naturally through the space, creating a sense of calm and order.
Key Principles for Creating Unity and Harmony
Creating a unified and harmonious garden requires a thoughtful approach to repetition, consistency, and balance. Each element in the garden—plants, structures, hardscaping, and decorative features—should contribute to the overall sense of cohesion.
1. Repetition of Elements
Repetition is one of the most effective ways to create unity in a garden. When similar shapes, colors, textures, and forms are repeated throughout the space, they create a sense of rhythm and consistency. Repetition helps tie different areas of the garden together and establishes a visual flow.
- Repetition of Plants:
- Repeat the same species or group of plants in different areas of the garden.
- For example, planting lavender (Lavandula angustifolia) along multiple pathways creates a consistent visual thread.
- Use repetition to reinforce structural elements—clumps of ornamental grasses at regular intervals can create a sense of rhythm.
- Repetition of Color:
- Establish a limited color palette and repeat it throughout the garden.
- For example, using shades of purple, green, and white in planting beds creates a cohesive look.
- Echo color combinations in planting beds and hardscaping (e.g., pairing blue flowers with grey stone).
- Repetition of Form:
- Repeating similar plant shapes—such as rounded shrubs or columnar trees—creates a sense of visual order.
- For example, lining a walkway with evenly spaced columnar yews (Taxus baccata) creates a structured, harmonious feel.
- Repetition of Texture:
- Repeat fine or coarse textures throughout the garden to create a subtle sense of consistency.
- For example, using feathery grasses and finely textured perennials in several different beds reinforces unity.
Best Practices:
✅ Repeat an element at least three times to establish rhythm and unity.
✅ Ensure that repetition is balanced rather than rigid—avoid overly symmetrical or mechanical repetition unless aiming for a formal design.
✅ Mix repetition with variation to prevent monotony—slight variations in color or height keep the design dynamic.
Example:
- A garden might repeat lavender, salvia, and ornamental grasses in several beds, but vary the heights and combinations slightly to create flow without strict uniformity.
2. Consistency in Materials
Consistency in hardscape materials (like stone, wood, metal, and brick) helps to reinforce unity by tying different areas of the garden together. When materials are mismatched, the garden can feel disjointed, even if the plantings are harmonious.
- Paving and Pathways:
- Use the same type of paving stone or gravel throughout the garden.
- For example, if using limestone for a patio, extend the same material to garden paths for a seamless transition.
- Avoid mixing materials like red brick, grey concrete, and natural stone in the same space—it can create visual clutter.
- Garden Structures:
- Use consistent materials for pergolas, trellises, fences, and seating.
- For example, a wooden pergola paired with a metal trellis might create a mismatched effect, whereas using matching wood for both would reinforce cohesion.
- Planters and Pots:
- Use the same style and material for garden pots and containers.
- For example, a row of terracotta pots creates a cohesive look, while mixing plastic, metal, and clay pots can feel scattered and unbalanced.
Best Practices:
✅ Match the material palette with the overall garden style—natural stone for rustic or cottage gardens, smooth concrete for modern spaces, and brick for traditional designs.
✅ Keep material textures consistent—avoid pairing rough stone with smooth concrete unless the contrast is intentional.
✅ Use edging materials (like brick or stone) to visually link different areas of the garden.
Example:
- A Mediterranean-style garden might use limestone paving, terracotta pots, and rustic wooden furniture to maintain a consistent material palette.
3. Unifying Plant Types
Grouping plants with similar growth habits, foliage types, or bloom times reinforces unity by creating consistent patterns and textures. Similar plant forms help establish rhythm and cohesion.
- Foliage Consistency:
- Use plants with similar foliage textures or colors to create visual connection.
- For example, pairing silver-leaved plants like lamb’s ear (Stachys byzantina) and artemisia (Artemisia spp.) creates a harmonious effect.
- Growth Habit:
- Group plants with similar growth patterns, such as mounding, spreading, or upright.
- For example, combining mounding plants like coreopsis with upright plants like veronica creates a balanced look.
- Seasonal Blooming:
- Select plants with overlapping bloom times to create consistent color throughout the season.
- For example, planting early-blooming tulips, followed by summer-blooming echinacea and late-blooming asters maintains visual flow through the year.
Best Practices:
✅ Avoid planting too many different species in a single bed—it can create a chaotic look.
✅ Use similar foliage shapes or colors to tie different areas together.
✅ Mix evergreen and deciduous plants to ensure consistency throughout the year.
Example:
- A border of blue fescue (Festuca glauca) combined with purple salvia (Salvia nemorosa) and silver lamb’s ear creates a cohesive blend of color, texture, and growth habit.
4. Transition and Flow
Unity also involves creating smooth visual and physical transitions between different areas of the garden. Abrupt changes in plant height, color, or texture can feel jarring and break the sense of flow.
- Gradual Height Changes:
- Layer plants by height to create a natural progression.
- For example, transition from tall ornamental grasses at the back to shorter perennials and groundcovers at the front.
- Color Gradation:
- Shift color tones gradually rather than abruptly.
- For example, transition from pale blues and whites to deeper purples and reds rather than jumping from white to bright red.
- Pathway Flow:
- Ensure that paths and stepping stones lead naturally through the garden without sharp turns or dead ends.
- For example, a gently curving path lined with repeating lavender plants creates a natural flow.
Best Practices:
✅ Use plants and hardscape elements to guide the eye through the garden.
✅ Ensure that transitions between planting beds, paths, and structures feel intentional and natural.
✅ Avoid creating isolated planting beds—connect them visually with repeated plants or edging materials.
Example:
- A woodland-style garden might use curved gravel paths lined with ferns and hostas to create a sense of softness and flow.
✅ Key Takeaways:
- Repetition of plants, colors, forms, and textures reinforces visual unity.
- Consistency in materials ties different parts of the garden together.
- Grouping similar plant types creates rhythm and flow.
- Smooth transitions between height, color, and texture create a sense of movement.
The principles of unity and harmony in garden design can be used to create a garden that feels calm, intentional, and visually balanced—a space where all the elements work together to create a cohesive and inviting atmosphere.
2. Balance

Balance refers to the even distribution of visual weight within the garden. A balanced garden creates a sense of stability and comfort, where no single element feels overpowering or out of place. There are two types of balance that can be used depending on the desired style of the garden:
- Symmetrical Balance: This balance is formal and structured, with elements on one side mirroring those on the other. For example, identical rows of shrubs flanking a central pathway create a classic look seen in traditional French and Italian gardens.
- Asymmetrical Balance: Asymmetry is more natural and relaxed, achieved by arranging different shapes, sizes, and textures. For example, balancing a large tree with a cluster of tall perennials and a bench creates a dynamic but balanced look.
- Visual Weight: Larger, darker objects and bold colors carry more visual weight than smaller, lighter ones. For balance, a large dark shrub can be paired with smaller, lighter plants on the opposite side of a pathway.
Balance in garden design refers to the even distribution of visual weight within the space, creating a sense of stability and comfort. A balanced garden feels natural and intentional, where no single element dominates or feels out of place. Achieving balance allows the viewer’s eye to move comfortably through the garden, creating a harmonious and visually pleasing experience.
A well-balanced garden creates a sense of calm and order, regardless of the garden’s size or style. Whether through formal symmetry or a more relaxed natural balance, the key is to ensure that visual weight is distributed evenly so that no part of the garden feels too heavy or too empty.
Balance is particularly important in garden design because outdoor spaces are constantly changing. Plants grow, flower, and die back; sunlight shifts throughout the day; and seasonal changes alter the color and texture of the garden. A balanced design ensures that these changes enhance rather than disrupt the overall harmony of the space.
Types of Balance in Garden Design
Balance can be created in two primary ways: symmetrical balance and asymmetrical balance. Both approaches rely on distributing visual weight through the careful placement of plants, hardscaping, and decorative elements. The choice between symmetrical and asymmetrical balance depends on the overall style and mood of the garden.
1. Symmetrical Balance
Symmetrical balance creates a formal, structured, and orderly look. It is based on the principle of mirroring, where one side of the garden reflects the other along a central axis. This type of balance is often seen in classical, French, and Italian-style gardens.
Symmetry appeals to the human brain because it reflects natural patterns found in nature, such as the symmetry of leaves, flowers, and even the human body. It creates a sense of calm and predictability, which can make a garden feel elegant and timeless.
- Examples:
- A central path flanked by identical rows of boxwood hedges.
- Two identical planters on either side of a garden gate.
- A symmetrical fountain positioned at the intersection of two pathways.
- Matching topiary shrubs positioned on either side of a bench.
Best Uses:
✅ Symmetry is ideal for formal gardens, courtyards, and entryways where a structured, polished look is desired.
✅ It works well in small gardens because symmetry creates a sense of order and makes the space feel larger.
✅ Symmetry is effective in gardens with architectural features, such as fountains, statues, and gates, as it reinforces their visual strength.
How to Achieve Symmetry:
- Start with a central axis (e.g., a path or water feature) and build the design outward in mirrored patterns.
- Use identical or closely matched plants, containers, and hardscape materials on both sides of the axis.
- Keep plant heights and textures consistent to reinforce the symmetry.
- Ensure that plant spacing is even and consistent to avoid disrupting the balance.
Example:
- A formal Italian-style garden might feature a long gravel path with identical lavender plants on each side, leading to a statue framed by two symmetrical yew hedges.
2. Asymmetrical Balance
Asymmetrical balance is more relaxed and naturalistic. Instead of mirroring elements on either side of a central axis, balance is achieved through the careful arrangement of different shapes, sizes, and textures. Asymmetry creates a sense of movement and spontaneity while maintaining overall harmony.
Asymmetry reflects the irregular patterns found in nature—forests, meadows, and wildflower fields are rarely symmetrical, yet they maintain a natural sense of balance.
- Examples:
- A large tree on one side of a path balanced by a group of ornamental grasses and flowering perennials on the opposite side.
- A curved flower bed with a mix of tall and low plants, balanced by a bench or sculpture in the background.
- A natural pond bordered by plants of varying heights and textures, balanced by a stone pathway on the opposite side.
- A wildflower meadow balanced by a line of low shrubs or grasses.
Best Uses:
✅ Asymmetry is ideal for informal, naturalistic, and cottage-style gardens.
✅ It works well in large or irregularly shaped gardens where a mirrored design would feel forced or unnatural.
✅ Asymmetry allows for more creative freedom and variation in plant height, color, and texture.
How to Achieve Asymmetry:
- Use contrasting plant heights, textures, and colors to balance visual weight.
- Balance larger plants or objects with clusters of smaller plants or ground cover.
- Create focal points with plants or structures, then balance them with complementary forms or textures on the opposite side.
- Repeat colors or textures to establish cohesion without creating a mirrored effect.
Example:
- A Japanese-style garden might feature a large, sculptural pine tree balanced by a cluster of bamboo and a stone lantern positioned diagonally across the space.
3. Radial Balance
Radial balance is a variation of symmetrical balance where elements are arranged around a central focal point in a circular or radiating pattern. This creates a sense of visual harmony and stability while encouraging the eye to move outward from the center.
- Examples:
- A circular fountain with planting beds radiating outward.
- A round patio bordered by curved flower beds.
- A sunburst arrangement of ornamental grasses surrounding a birdbath.
Best Uses:
✅ Radial balance works well in round or square courtyards where the viewer naturally looks toward the center.
✅ It is effective for creating intimate gathering spaces within larger gardens.
✅ It creates a sense of order while maintaining a softer, organic feel.
How to Achieve Radial Balance:
- Use a circular or polygonal pattern as the base for planting and hardscape design.
- Establish a strong central focal point (e.g., a fountain or tree) to anchor the design.
- Arrange plants in repeating patterns or graduated heights around the central element.
4. Visual Weight and Scale
Visual weight refers to how the size, color, and texture of plants and objects influence the perception of balance. Larger, darker, or more textured elements carry more visual weight than smaller, lighter, or less textured ones. Balancing visual weight is key to creating harmony within the garden.
- Dark vs. Light Colors:
- Dark green foliage and deep-colored flowers carry more visual weight than lighter shades.
- Balance dark plants with lighter-colored plants or open spaces to prevent heaviness.
- Coarse vs. Fine Texture:
- Coarse-textured plants (like hostas and elephant ears) carry more visual weight than fine-textured plants (like ferns and grasses).
- Use coarse plants as anchors and fine-textured plants to fill spaces and soften the edges.
- Height and Mass:
- Tall plants and structures naturally carry more visual weight.
- Balance a tall tree or structure with a grouping of smaller plants or decorative elements.
Example:
- A large Japanese maple tree with deep red foliage might be balanced by a group of light-colored grasses and a stone lantern positioned nearby.
5. Balancing Hardscape and Softscape
Hardscaping (patios, walls, paths) and softscaping (plants, trees, flowers) should be balanced to prevent the garden from feeling too hard or too wild.
- Balance heavy paving areas with soft, trailing plants or ornamental grasses.
- Use climbing plants on trellises or walls to soften harsh architectural lines.
- Ensure that hardscaping materials match the tone and texture of the surrounding plants.
✅ Key Takeaways:
- Symmetrical balance creates order and formality.
- Asymmetrical balance creates a natural, relaxed feel.
- Radial balance creates a strong, centralized effect.
- Dark colors, large plants, and coarse textures carry more visual weight—balance them with lighter elements.
- Hardscape and softscape should complement each other to maintain balance.
The principles of balance in garden design can be used to create a garden that feels stable, harmonious, and visually pleasing—regardless of size or style.
3. Proportion and Scale

Proportion refers to the size relationship between individual elements in the garden, while scale relates to how those elements fit within the overall garden space. A garden that feels balanced in size and scale creates a comfortable and visually pleasing environment.
- Plant Height and Mass: Large plants can overwhelm small spaces, while tiny plants may get lost in vast areas. Tall bamboo may screen a fence but can overpower a small courtyard.
- Path and Bed Width: The width of beds and pathways should match the garden’s size. A narrow path can feel out of place in a large garden, while a wide one might overwhelm a small space.
- Layering Heights: Planting in layers, with taller plants at the back and shorter ones in front, creates a natural progression that draws the eye through the garden.
Proportion and scale are essential principles in garden design that determine how well the various elements—plants, hardscaping, structures, and decorative features—fit together and relate to the overall garden space. A well-proportioned garden feels balanced and comfortable, while a garden that is out of scale can feel overwhelming or visually jarring.
- Proportion refers to the size relationship between individual elements within the garden. For example, a large tree placed next to a small flower bed can make the bed feel insignificant, while a small planter placed beside a large statue may feel lost or out of place.
- Scale refers to how those elements relate to the overall size and shape of the garden. For example, a wide pathway in a small courtyard can feel excessive, while a narrow path in a large open space may feel underwhelming.
Good proportion and scale create a sense of harmony where the size and placement of each element feel intentional and balanced. They ensure that the garden feels inviting rather than chaotic or cramped. Understanding how to work with proportion and scale allows you to manipulate space, create focal points, and enhance the overall flow of the design.
Key Principles for Achieving Proportion and Scale
Successful garden designs balance proportion and scale by thoughtfully arranging plant heights, pathway widths, structural elements, and open spaces. Combining large and small elements strategically creates depth, rhythm, and a sense of flow.
1. Plant Height and Mass
The height and mass of plants significantly influence the balance and visual weight of a garden. Large plants provide structure and define space, but they can easily overwhelm small areas if not balanced properly.
- Tall Plants:
- Use tall plants such as trees and large shrubs to create vertical structure.
- Place them at the back of borders or along the edges of pathways to frame the space.
- For example, bamboo (Phyllostachys spp.) can create an elegant screen along a fence line but would feel overpowering if planted in a small courtyard.
- Medium Plants:
- Medium-height plants (like flowering perennials) help create a transition between tall and low-growing plants.
- Position them in the middle layer of a planting bed to soften the contrast between taller and shorter plants.
- For example, echinacea (Echinacea purpurea) can create a vibrant middle layer between ornamental grasses and low groundcovers.
- Short Plants:
- Use low-growing plants (like ground covers and compact perennials) to fill gaps and define edges.
- Placing low plants at the front of a border allows taller plants behind them to stand out without feeling disconnected.
- For example, creeping thyme (Thymus serpyllum) creates a soft edge along pathways and contrasts well with taller salvia or lavender.
Best Practices:
✅ In mixed borders, aim for a height ratio of approximately 1:2:3 (short: medium: tall) to create a balanced progression.
✅ Group plants in odd numbers (3, 5, or 7) for a more natural, harmonious appearance.
✅ Avoid placing very tall plants near small seating areas—they can feel oppressive or claustrophobic.
Example:
- A row of ornamental grasses like miscanthus (Miscanthus sinensis) at the back of a border, with echinacea in the middle and creeping thyme at the front, creates a layered and balanced effect.
2. Path and Bed Width
The width of garden paths, planting beds, and open spaces should be in proportion to the overall size of the garden. Paths that are too wide or narrow relative to the garden size can disrupt the visual balance and flow of movement.
- Pathways:
- Wide paths create a sense of openness and formality.
- Narrow paths create a sense of intimacy and enclosure.
- In a large garden, a wide gravel path (at least 1.5 m or 5 ft) allows two people to walk comfortably side by side.
- In a small courtyard, a narrow stepping-stone path (0.5–0.75 m or 1.5–2.5 ft) creates a cozy, meandering feel.
- Planting Beds:
- Beds that are too narrow can look underwhelming, while overly large beds can feel out of scale with the rest of the garden.
- A bed depth of 1–1.5 m (or 3–5 ft) is ideal for most mixed plantings, allowing room for layered plants without overcrowding.
- Open Spaces:
- Open lawn areas should be proportional to the surrounding hardscaping and plantings.
- A small patch of lawn surrounded by tall hedges may feel claustrophobic, while a large lawn with no surrounding plants may feel exposed and empty.
Best Practices:
✅ Maintain a consistent path width to create a sense of rhythm and flow.
✅ Use wider paths in formal gardens and narrower paths in informal or cottage-style gardens.
✅ Create clear transitions between paths and planting areas using edging materials like brick, stone, or low-growing plants.
Example:
- A formal garden might feature a wide, straight stone pathway leading to a fountain, flanked by symmetrical hedges.
- An informal woodland garden might use a narrow, winding path made of bark or gravel, softened by ferns and hostas.
3. Layering Heights
Layering plants by height creates a natural sense of depth and structure. A layered design allows the eye to move through the space smoothly, enhancing the sense of order and proportion.
- Tall Plants:
- Place at the back of borders or against walls to define the garden’s perimeter.
- Use tall plants to frame views and create a sense of enclosure.
- Example: A row of tall ornamental grasses creates a natural screen.
- Medium Plants:
- Use medium-height plants to create a soft transition between tall and low plants.
- Example: Grouping echinacea and salvia creates a natural flow between taller shrubs and low-growing ground covers.
- Short Plants:
- Place low-growing plants at the front of a border or along the edge of a path.
- Example: Creeping thyme and sedum soften the edge of a stone pathway.
Best Practices:
✅ Use plants of varying heights to create dynamic interest.
✅ Avoid a “stairstep” effect—overlapping plant heights creates a more natural look.
✅ Ensure that taller plants do not overshadow or block smaller plants from view or sunlight.
Example:
- A mixed border with tall hollyhocks at the back, medium-height daisies in the middle, and creeping thyme at the front creates a visually layered and balanced display.
4. Scale of Decorative and Structural Elements
Hardscape features and decorative objects should be scaled to fit the garden’s size and style. An oversized sculpture in a small courtyard can feel overwhelming, while a small bench in a large open space may feel insignificant.
- Furniture:
- Benches and tables should feel proportional to the surrounding space.
- A small wooden bench works well in a secluded garden corner, while a large stone bench suits an open lawn.
- Statues and Sculptures:
- Use larger sculptures as focal points in expansive gardens.
- Smaller statues work better in intimate spaces or within planting beds.
- Fountains and Water Features:
- A large fountain suits a formal, open courtyard.
- A small bubbling rock is more appropriate for a woodland setting.
Best Practices:
✅ Ensure that decorative features are visible but not overpowering.
✅ Group smaller elements together to create a sense of mass and proportion.
✅ Use similar materials for structures and furniture to create cohesion.
Example:
- A large iron pergola fits well in a spacious garden, while a delicate wooden arbor suits a small cottage garden.
✅ Key Takeaways:
- Proportion refers to the size relationship between elements; scale refers to how those elements fit within the overall space.
- Layer plants by height (tall in back, medium in middle, short in front) to create depth and flow.
- Paths and beds should be appropriately sized to match the overall garden scale.
- Hardscape features should be in proportion with the surrounding plants and structures.
- Achieving balanced proportion and scale creates a comfortable, visually appealing garden.
The principle of proportion and scale in garden design can be used to create a garden that feels harmonious, inviting, and perfectly balanced.
4. Rhythm and Repetition

Rhythm is created through the repetition of patterns, shapes, colors, and textures. Just as music has a rhythm that creates flow and anticipation, a garden can have a visual rhythm that guides the viewer’s eye through the space.
- Repetition of Plant Forms: Repeating similar plant shapes, such as clumps of ornamental grasses or spiky-leaved succulents, creates a sense of order and flow.
- Color Echoing: Repeating the same color or group of colors in different parts of the garden reinforces continuity. For example, red foliage in one bed echoed by red flowers in another bed ties the design together.
- Path and Border Patterns: Curved or straight pathways lined with repeating patterns of plants or stones create a sense of progression and continuity.
Rhythm and repetition are fundamental principles in garden design that create a sense of flow, movement, and order. Just as music relies on repeating beats and patterns to create rhythm, a garden uses repeating shapes, colors, textures, and forms to guide the eye and establish visual continuity. Rhythm gives the garden a sense of progression and unity, leading the viewer naturally from one area to another.
Without rhythm and repetition, a garden can feel chaotic and disconnected. A well-designed garden creates a natural flow where the viewer’s eye follows a predictable yet engaging path through the space. Repetition of similar elements ties the different parts of the garden together, while carefully placed variations prevent monotony and add visual interest.
Rhythm also helps define the mood and pace of the garden. A garden with strong, structured repetition feels formal and controlled, while one with softer, irregular repetition feels more relaxed and organic. Understanding how to use repetition and rhythm effectively allows you to design a garden that feels balanced and harmonious while maintaining a sense of movement and progression.
Key Principles for Creating Rhythm and Repetition
Creating rhythm and repetition involves carefully balancing consistency and variety. Too much repetition can make a garden feel monotonous, while too little can make it feel disorganized. The key is to find a balance between repeated patterns and contrasting elements that add texture and visual interest.
1. Repetition of Plant Forms
Repeating similar plant shapes and forms throughout the garden creates a sense of order and cohesion. The human eye naturally seeks patterns, so repeating plant forms helps organize the space and make it feel intentional.
- Clumping Plants:
- Group plants with similar shapes together to create rhythm.
- For example, planting clusters of ornamental grasses at regular intervals along a pathway reinforces visual flow.
- Clumping plants in odd numbers (e.g., groups of 3, 5, or 7) creates a natural look that avoids symmetry while maintaining structure.
- Vertical vs. Horizontal Forms:
- Repeating vertical plants (like columnar cypress) creates a sense of height and movement.
- Horizontal ground covers and mounding plants provide stability and contrast.
- For example, alternating vertical and horizontal forms along a pathway creates a balanced and dynamic visual effect.
- Rounded vs. Spiky Forms:
- Rounded shrubs and plants create a sense of calm and softness.
- Spiky-leaved plants like agave or yucca add sharp contrast and create movement.
- For example, pairing rounded boxwood with spiky blue fescue creates a balanced yet engaging pattern.
Best Practices:
✅ Repeat plant forms at regular intervals to reinforce rhythm.
✅ Use contrasting shapes to prevent monotony.
✅ Group plants with similar forms together to create cohesive clusters.
Example:
- A garden border with alternating clumps of lavender and ornamental grasses creates a repeating pattern that draws the eye along the edge of the path.
2. Color Echoing
Repetition of color creates a strong sense of unity and flow. When the same colors appear in different parts of the garden, they visually link the areas together and create continuity.
- Monochromatic Color Schemes:
- Using varying shades of the same color creates a subtle and elegant rhythm.
- For example, shades of purple (lavender, salvia, and allium) combined with green foliage create a soothing and cohesive look.
- Complementary Color Schemes:
- Complementary colors (like blue and orange or red and green) create high contrast and visual excitement.
- For example, pairing blue salvia with orange marigolds creates a dynamic but balanced look.
- Echoing Colors Across the Garden:
- Repeating a particular color in different areas of the garden ties the design together.
- For example, deep burgundy foliage from a Japanese maple echoed by dark red penstemon in a distant bed creates a sense of visual connection.
- Seasonal Color Changes:
- Using plants that bloom in coordinated colors during different seasons creates a changing but consistent rhythm.
- For example, early spring bulbs in shades of yellow and white followed by summer blooms in similar tones create continuity through the seasons.
Best Practices:
✅ Limit the color palette to 2–4 dominant colors to avoid visual chaos.
✅ Echo colors in planting beds, containers, and hardscaping elements (e.g., repeating terracotta pots).
✅ Introduce color in layers—combine foliage color with flower color for added depth.
Example:
- A cottage garden with pink roses, purple lavender, and white daisies repeated throughout different beds creates a consistent and inviting color pattern.
3. Path and Border Patterns
Paths and borders define the flow of movement within a garden. Repeating patterns along paths and borders creates a sense of progression and continuity.
- Curved Paths:
- Curved paths create a softer, more relaxed rhythm.
- For example, a winding gravel path lined with lavender and thyme creates a natural, flowing rhythm.
- Straight Paths:
- Straight paths create a more formal and structured rhythm.
- For example, a straight brick path lined with clipped boxwood creates a strong sense of order and repetition.
- Alternating Planting Patterns:
- Repeating patterns of plants along a border or path create visual rhythm.
- For example, alternating salvia and ornamental grasses along a walkway creates a structured, repeating pattern.
- Edge Definition:
- Clearly defined edges reinforce rhythm and repetition.
- For example, a low hedge or row of stones creates a repeating visual boundary along a path.
Best Practices:
✅ Use symmetrical planting along formal paths for a structured effect.
✅ Use irregular planting along curved paths for a naturalistic effect.
✅ Create contrasting edge textures with soft plants and hard materials (e.g., grasses against stone).
Example:
- A woodland path lined with ferns and hostas creates a soft, flowing rhythm, while a formal rose garden with straight brick paths creates a structured, repeating pattern.
4. Structural Repetition
Repetition of hardscape elements (like trellises, gates, and benches) reinforces rhythm and provides a sense of order. Structural repetition is especially important in large gardens where plant repetition alone may not be enough to unify the design.
- Arches and Trellises:
- Placing similar arches or trellises at regular intervals creates a repeating pattern and frames the view.
- For example, a series of wooden trellises supporting climbing roses creates a repeating vertical element.
- Benches and Seating Areas:
- Repeating the same style of bench or seat throughout the garden creates visual consistency.
- For example, matching stone benches positioned at different sightlines create a unified effect.
- Pots and Containers:
- Using identical or similar pots creates a repeating element that ties different areas together.
- For example, terracotta pots planted with succulents repeated along a patio wall create rhythm and cohesion.
Best Practices:
✅ Repeat structural elements at regular intervals to reinforce the sense of rhythm.
✅ Keep material types consistent for visual unity.
✅ Use climbing plants or hanging baskets on trellises to soften hard lines.
Example:
- A series of wooden pergolas connected by grapevines creates a repeating architectural feature that draws the eye through the garden.
5. Texture and Material Repetition
Repeating similar textures and materials reinforces rhythm and creates a cohesive look.
- Plant Texture:
- Repeat fine or coarse-textured plants throughout the garden.
- For example, using ornamental grasses and ferns in different beds creates a repeating textural effect.
- Material Texture:
- Repeat stone, wood, or metal finishes in hardscaping.
- For example, repeating natural stone in pathways and garden walls reinforces consistency.
Example:
- A gravel path lined with stone edging and repeated patches of thyme creates a unified, repeating pattern of texture and material.
✅ Key Takeaways:
- Repetition of plant forms, colors, and textures creates rhythm and visual flow.
- Curved and straight paths establish movement and order.
- Structural repetition reinforces rhythm and ties different areas together.
- Texture and material repetition create consistency and harmony.
- Balanced variation prevents monotony while maintaining cohesion.
The principles of rhythm and repetition in garden design can be used to design a garden that feels cohesive, dynamic, and inviting—a space where the eye moves naturally and effortlessly through the landscape.
5. Color

Color is one of the most emotionally engaging aspects of garden design. It sets the mood and defines the atmosphere of a space. Color combinations can either create harmony or high contrast, depending on the intended effect.
- Analogous Colors: Colors next to each other on the color wheel (such as blue, green, and purple) create a calming and cohesive effect.
- Complementary Colors: Colors opposite each other on the color wheel (such as red and green or yellow and purple) create strong contrast and vibrant energy.
- Seasonal Color: A well-designed garden incorporates colors that change with the seasons, ensuring year-round interest. For example, spring bulbs, summer perennials, autumn foliage, and winter bark create dynamic seasonal interest.
Color is one of the most emotionally engaging and visually powerful aspects of garden design. It sets the mood, defines the atmosphere, and influences how a garden is experienced and perceived. The careful use of color can create harmony, contrast, excitement, or tranquility, depending on how colors are combined and balanced within the space.
Unlike other design elements, color is dynamic—it changes with the seasons, light conditions, and even the time of day. A well-balanced color palette ties the different elements of a garden together, reinforcing a sense of unity and flow. Strategic use of color can also highlight focal points, define pathways, and create visual depth.
Color in garden design isn’t limited to flowers—it includes foliage, bark, fruit, and even hardscape elements like paving stones, walls, and furniture. Understanding how to work with color theory and plant characteristics allows you to create a garden that remains visually engaging throughout the year.
Key Principles for Using Color Effectively
Color in a garden follows the same basic rules as color in art and interior design. Colors that are close together on the color wheel create a sense of harmony and calm, while contrasting colors create excitement and visual energy. Understanding how to balance these effects helps to create a garden that feels both inviting and balanced.
1. Analogous Colors
Analogous colors are those that sit next to each other on the color wheel (such as blue, green, and purple). They create a calming, cohesive effect because they share similar undertones and naturally blend together.

- Blue, Green, and Purple:
- A garden dominated by cool tones creates a sense of calm and relaxation.
- For example, pairing blue delphiniums, green ferns, and purple salvia creates a cool, soothing atmosphere.
- Yellow, Orange, and Red:
- Warm analogous colors create a sense of warmth and vibrancy.
- For example, planting yellow coreopsis, orange daylilies, and red blanket flowers together creates a vibrant summer display.
- Muted Analogous Schemes:
- Soft shades of blue, lavender, and pale green create a delicate and understated effect.
- For example, using bluebells, silver lamb’s ear, and pale lavender maintains subtlety while reinforcing color harmony.

Best Uses:
✅ Use analogous color schemes in areas designed for relaxation, such as seating areas or shaded corners.
✅ Pair with fine-textured foliage to maintain softness and prevent visual heaviness.
✅ Analogous colors work well in shaded or low-light areas, where they maintain a soft, blended effect.
Example:
- A woodland garden with green ferns, bluebells, and purple hostas creates a calm, unified atmosphere.
2. Complementary Colors
Complementary colors are those that sit opposite each other on the color wheel (such as red and green or blue and orange). These combinations create high contrast and visual energy.

- Red and Green:
- The natural contrast between red flowers and green foliage makes the red appear more vibrant.
- For example, red roses against a backdrop of deep green boxwood create a bold, eye-catching effect.
- Yellow and Purple:
- Yellow and purple create a vibrant, playful contrast.
- For example, planting golden coreopsis alongside purple salvia creates a striking combination.
- Blue and Orange:
- Blue and orange create a lively, high-energy combination.
- For example, blue iris paired with orange marigolds creates a dynamic visual effect.

Best Uses:
✅ Use complementary colors to highlight focal points and create drama.
✅ Combine complementary colors in balanced amounts—too much contrast can feel overwhelming.
✅ Use green as a neutral background to separate and soften contrasting colors.
Example:
- A Mediterranean-style garden with deep blue salvia, bright orange marigolds, and green foliage creates an energized, balanced look.
3. Monochromatic Color Schemes
Monochromatic color schemes use different shades, tints, and tones of a single color. They create a subtle, sophisticated look that emphasizes texture and form.

- Shades of Green:
- A green-dominated garden creates a calm, natural feel.
- For example, combining different shades of green with contrasting textures (like ferns, hostas, and ornamental grasses) creates depth without overwhelming color.
- Shades of Purple:
- A purple-themed garden feels romantic and slightly moody.
- For example, planting lavender, alliums, and purple salvia together creates a cohesive effect.
- Shades of White:
- A white-themed garden feels crisp and elegant, especially in low light.
- For example, white roses, daisies, and astilbe create a classic, sophisticated look.
Best Uses:
✅ Monochromatic schemes work well in small gardens where complex color schemes may feel overwhelming.
✅ Use different textures and shapes to add visual interest.
✅ Layer shades of the same color to create depth.

Example:
- A moonlight garden planted with white roses, white foxgloves, and silver lamb’s ear creates a calming, reflective atmosphere.
4. Seasonal Color Changes
A well-designed garden incorporates colors that change with the seasons, ensuring year-round interest and variety.
- Spring:
- Focus on bright, fresh colors like yellow, pink, and pale blue.
- Example: Daffodils, tulips, and hyacinths provide early color.
- Summer:
- Warm colors like red, orange, and deep purple dominate summer gardens.
- Example: Dahlias, daylilies, and zinnias create a vibrant summer display.
- Autumn:
- Autumn gardens highlight earthy tones like gold, rust, and burgundy.
- Example: Japanese maple leaves, chrysanthemums, and sedum.
- Winter:
- Winter interest comes from foliage, bark, and structural elements.
- Example: Red-twig dogwood, evergreen holly, and ornamental grasses.
Best Uses:
✅ Select plants that provide seasonal color without disrupting the overall color palette.
✅ Ensure that the transition between seasonal colors is gradual rather than abrupt.
✅ Incorporate evergreen plants to maintain color and structure during the winter.
Example:
- A mixed border of spring bulbs, summer perennials, and autumn foliage plants creates continuous color from spring through fall.
5. Foliage Color and Texture
Flower color is often the first consideration in garden design, but foliage color plays an equally important role in creating visual depth and contrast.
- Silver and Blue Foliage:
- Silver and blue tones create a cool, calming effect.
- Example: Lamb’s ear, blue fescue, and dusty miller.
- Golden and Variegated Foliage:
- Bright yellow and gold leaves create warmth and energy.
- Example: Golden hostas, variegated euonymus, and coleus.
- Dark and Burgundy Foliage:
- Deep red and burgundy tones create depth and drama.
- Example: Japanese maples, heuchera, and purple fountain grass.
Best Uses:
✅ Use foliage color to maintain interest when flowers aren’t in bloom.
✅ Combine fine-textured and bold-textured foliage for contrast.
✅ Use silver and blue foliage to create a calming backdrop for brighter blooms.
Example:
- A garden featuring burgundy heuchera, golden hostas, and silver dusty miller creates a balanced, colorful display even when flowers aren’t present.
6. Transition and Flow
The transition between color blocks should be gradual rather than abrupt to maintain a sense of harmony.
- Use intermediate shades to soften transitions:
- Example: Transitioning from blue to yellow through shades of lavender or pale green.
- Create defined color areas:
- Example: A white garden bed next to a vibrant red and yellow border, separated by a hedge or low-growing plants.
Best Practices:
✅ Avoid abrupt color changes unless intentional.
✅ Use green foliage to separate bold colors and create visual rest.
✅ Repeat color patterns at regular intervals to maintain rhythm.
✅ Key Takeaways:
- Analogous colors create harmony and calm.
- Complementary colors create contrast and energy.
- Seasonal color ensures year-round interest.
- Foliage color and texture are as important as flower color.
- Gradual transitions maintain visual flow.
By using the principle of color theory in garden design and understanding how to combine different shades and tones, you can create a garden that feels vibrant, cohesive, and visually engaging year-round.
6. Texture

The principle of Texture illustrated by the combination of contrasting textures from grasses, broad-leaf plants, and flowering shrubs to create a balanced and visually interesting design. Texture refers to the surface quality of plants and materials. Texture influences how light and shadow interact within the garden, adding depth and visual complexity.
- Fine vs. Coarse Texture: Fine-textured plants (like ferns) have a delicate appearance, while coarse-textured plants (like hostas) create a bold, dramatic effect.
- Material Texture: Rough stone paths, smooth metal garden sculptures, and the feathery texture of ornamental grasses create a rich sensory experience.
- Light and Shadow: Plants with a glossy surface reflect light differently than matte-finished leaves, creating dynamic contrasts.
Texture refers to the surface quality of plants and materials, influencing how light and shadow interact within the garden and adding depth and visual complexity. Texture plays a vital role in creating visual interest and guiding the viewer’s eye through the garden. By combining contrasting textures thoughtfully, you can create balance and harmony while highlighting focal points or softening hard lines.
Fine vs. Coarse Texture
Plants can be broadly categorized into fine-textured and coarse-textured types based on the size and surface quality of their leaves and stems. Successfully combining different textures requires an understanding of how they visually interact:
- Fine Texture – Fine-textured plants have small, delicate leaves or thin stems, which create a soft, airy appearance. They tend to recede into the background, adding subtlety and lightness to a planting scheme. Examples include ferns, grasses, and herbs like dill or fennel.
- Use fine-textured plants to soften edges and provide a sense of depth.
- Group them together to create a feathery or misty effect in the background or as underplanting.
- Fine textures are effective when used as a filler between larger, bolder plants.
- Coarse Texture – Coarse-textured plants have large, bold leaves or thick stems that create a strong visual impact. They stand out in the landscape and draw attention. Examples include hostas, gunnera, rhubarb, and elephant ears.
- Use coarse-textured plants as focal points or anchor plants in a bed.
- Combine them with fine-textured plants to create contrast and prevent the design from feeling flat.
- Use coarse plants to visually balance large structures or hardscaping elements.
Practical Tip: A general rule is to use a ratio of approximately 70% fine to 30% coarse texture in a planting scheme to maintain visual balance. Too many coarse-textured plants can make a garden feel heavy and overgrown, while an excess of fine textures can appear weak or washed out.
Combining Textures for Visual Interest
When combining plants with different textures, follow these guidelines to create a balanced and cohesive look:
- Contrast and Balance: Pair fine-textured plants with coarse-textured ones to create contrast. For example, plant a delicate maidenhair fern next to a bold hosta to highlight the differences in texture.
- Layering: Place coarse-textured plants at the back of a border or as structural anchors, with fine-textured plants in front to create a natural progression and depth.
- Grouping: Group similar textures together to create a cohesive look, but break up the grouping with contrasting textures to add interest and avoid monotony.
- Alternating Textures: Create a rhythmic effect by alternating plants with different textures along a path or border. This technique creates a sense of movement and flow.
- Use Texture to Direct the Eye: Fine textures draw the eye toward them more softly, while coarse textures demand attention. Use coarse plants to frame pathways, entries, or focal points, and fine-textured plants to soften these edges.
Material Texture
Texture extends beyond plants to the materials used for hardscaping and structures in the garden. The interplay between natural and man-made textures enhances the overall sensory experience:
- Hardscaping: Combine rough stone pathways with smooth wooden benches to create a textural contrast.
- Structures: Metal trellises or wire frames can provide a modern, sleek look when paired with softer elements like vines or ornamental grasses.
- Ground Cover: Gravel, mulch, or bark can add texture to garden paths and planting beds while providing a unifying background for the plants.
- Containers and Pots: Choose textured ceramic or terracotta pots to add another layer of tactile interest.
Practical Tip: Keep hardscaping materials consistent in color and texture to avoid visual clutter. For example, if you use natural stone for pathways, avoid mixing in brick or concrete to maintain a cohesive look.
Light and Shadow
The texture of a plant determines how it reflects or absorbs light, creating different effects throughout the day:
- Glossy Leaves: Plants with shiny, reflective leaves, such as camellias or laurels, catch sunlight and create bright highlights.
- Use glossy plants in shaded areas to reflect light and brighten the space.
- Plant glossy-leaved plants near water features or white walls to enhance the reflective effect.
- Matte Leaves: Plants with a dull or fuzzy surface, such as lamb’s ear (Stachys byzantina), absorb light and create a more subdued, calming effect.
- Use matte-textured plants to create a softening effect and balance bright highlights from glossy plants.
- Combine matte foliage with dark green glossy leaves to create contrast and depth.
- Feathery or Fine Leaves: Plants like ferns and grasses catch light and create dappled shadows, adding movement and visual interest.
- Position them where they can catch backlight from the sun for a shimmering effect.
- Use feathery textures near pathways to soften the edges.
Seasonal Texture Changes
Texture is not static—it changes throughout the seasons as plants grow, flower, and die back. A well-designed garden takes these changes into account:
- Spring: Focus on soft, fresh textures from new foliage and flowering bulbs.
- Summer: Highlight bold textures from large leaves and fully grown ornamental grasses.
- Autumn: Incorporate structural textures from seed heads and drying foliage.
- Winter: Use evergreen plants, bark, and architectural features like trellises and sculptures to maintain texture when plants are dormant.
Practical Tip: Ornamental grasses, conifers, and evergreen shrubs provide year-round texture and prevent the garden from looking bare in winter.
Using Texture to Create Mood
Texture influences the overall atmosphere of a garden:
- Fine Textures: Create a light, airy, and tranquil feel. Ideal for meditation gardens or shaded areas.
- Coarse Textures: Create a sense of drama and boldness. Ideal for modern or tropical-style gardens.
- Mixed Textures: Combine fine and coarse textures to create complexity and visual richness. This approach works well in cottage or naturalistic gardens.
Practical Examples
- Formal Garden: Combine glossy-leaved boxwood with finely textured ornamental grasses and stone pathways to create a structured yet inviting look.
- Naturalistic Garden: Mix coarse-textured hostas with delicate ferns and feathery grasses for a relaxed, organic feel.
- Shade Garden: Use matte-leaved plants like hellebores and large-leaved hostas to balance the low light levels and create a calming atmosphere.
- Contemporary Garden: Pair smooth metal sculptures with rough stone borders and architectural plants like agave or yucca to create modern contrast.
- Mediterranean Garden: Combine coarse-leaved lavender and rosemary with fine-textured thyme and gravel pathways for a warm, rustic feel.
✅ Key Takeaways:
- Contrast fine and coarse textures to create balance and highlight individual plants.
- Group textures together for cohesion but avoid monotony by introducing contrasting textures at intervals.
- Consider how light interacts with plant surfaces to enhance or soften textures.
- Use textured hardscaping materials to complement and reinforce plant textures.
- Plan for seasonal texture changes to keep the garden visually interesting year-round.
The principle of texture in garden design can be used to create spaces that feel rich, inviting, and visually dynamic.
7. Form and Shape

Form refers to the three-dimensional shape of plants and structures. Shapes define the visual character and structure of the garden.
- Upright and Vertical Forms: Columnar plants like Italian cypress create height and structure.
- Rounded and Mounded Forms: Shrubs like boxwood create softness and mass.
- Weeping Forms: Plants like weeping willows add movement and create a sense of calm.
- Horizontal and Spreading Forms: Ground covers and creeping plants create a sense of stability and grounding.
Form refers to the three-dimensional shape and structure of plants and hardscape elements in a garden. It defines the visual character of a space, influences how the eye moves through the landscape, and establishes the overall mood and style of the garden. Thoughtful use of form creates structure, balance, and flow, guiding the viewer’s eye and shaping the garden’s atmosphere.
Plant forms vary widely, from tall, upright plants to low, spreading ground covers. Each form interacts with the others to create a balanced and cohesive design. Combining different forms thoughtfully can highlight focal points, create movement, and provide contrast and depth.
In garden design, form is one of the most permanent and defining elements because plants maintain their fundamental shapes throughout the year, even as colors and textures change with the seasons. Structural plants, such as evergreens and architectural shrubs, provide a consistent framework that gives the garden year-round visual interest.
Key Types of Plant Forms
Plants can be broadly classified into several primary forms. Successfully combining different forms creates contrast and balance, while repetition of forms creates a sense of rhythm and unity.
1. Upright and Vertical Forms
Upright and vertical forms create height and draw the eye upward, adding a sense of structure and drama to the garden. These forms are often used as architectural elements to create focal points or to provide a sense of enclosure.
- Examples: Italian cypress (Cupressus sempervirens), holly (Ilex aquifolium), and foxgloves (Digitalis purpurea).
- Best Use:
- Place at the entrance or corners of a garden to frame the space.
- Use as a backdrop to highlight shorter plants in front.
- Create vertical interest by interspersing tall plants along a pathway or bed.
- Pair with horizontal or mounded forms to create visual contrast and balance.
Practical Tip: Upright plants with narrow bases (such as tall grasses) can create a top-heavy look if not balanced by low or spreading plants at the base. Ground covers or mounded forms can help stabilize the look.
2. Rounded and Mounded Forms
Rounded and mounded forms create softness and provide a sense of comfort and enclosure. Their symmetrical, flowing shapes bring a feeling of order and calm to the garden.
- Examples: Boxwood (Buxus sempervirens), azaleas (Rhododendron spp.), and lavender (Lavandula angustifolia).
- Best Use:
- Use in mass plantings to create a structured, cohesive appearance.
- Place rounded shrubs near entryways or paths to create a welcoming effect.
- Combine rounded forms with more angular or upright plants to create contrast and soften hard edges.
- Use rounded shrubs or grasses to visually anchor a garden bed.
Practical Tip: Repetition of rounded forms creates unity and flow, but overuse can make a garden feel monotonous. Introduce contrasting forms to maintain interest.
3. Weeping Forms
Weeping forms add softness, movement, and a sense of relaxation. Their cascading branches or leaves create a calming effect, especially when placed near water or other reflective surfaces.
- Examples: Weeping willow (Salix babylonica), Japanese maple (Acer palmatum var. dissectum), and weeping cherry (Prunus pendula).
- Best Use:
- Place near water features to enhance the reflective quality of the surface.
- Use as focal points or specimen plants to draw attention.
- Combine with upright or mounded forms to create variety and balance.
- Incorporate in sheltered spaces or shaded areas to create a secluded, peaceful feel.
Practical Tip: Weeping plants with long, flexible branches can create a sense of movement in the breeze. Position them where they can catch natural light to highlight their cascading effect.
4. Horizontal and Spreading Forms
Horizontal and spreading forms provide a sense of stability and grounding. These forms create a visual foundation and help balance taller or more dramatic elements.
- Examples: Creeping thyme (Thymus serpyllum), trailing sedum (Sedum spp.), and spreading juniper (Juniperus horizontalis).
- Best Use:
- Use as ground covers to fill gaps and prevent soil erosion.
- Place along paths or in rock gardens to soften hard lines.
- Pair with upright or vertical forms to create contrast and balance.
- Use in the foreground of a border to visually anchor taller plants.
Practical Tip: Spreading plants can quickly overtake other plants if not carefully managed. Use edging or root barriers to keep them in check.
5. Architectural and Structural Forms
Certain plants have striking structural forms that define the overall look and feel of a garden. These are often used as focal points or framework plants.
- Examples: Agave (Agave americana), tree aloe (Aloe barberae), and New Zealand flax (Phormium spp.).
- Best Use:
- Place as focal points to draw the eye.
- Use in modern or minimalist garden designs to create bold lines and contrast.
- Combine with softer textures and rounded forms to avoid harshness.
Practical Tip: Architectural plants often thrive in well-drained soil and full sun. Group them with drought-tolerant plants to create a cohesive, low-maintenance planting scheme.
6. Irregular and Naturalistic Forms
Plants with irregular or asymmetrical shapes create a relaxed, naturalistic effect. They are often found in informal or cottage-style gardens.
- Examples: Wildflowers, mixed meadow grasses, and irregularly shaped shrubs.
- Best Use:
- Use in informal or wildflower gardens to create a natural, flowing look.
- Allow plants to self-seed and grow freely to create an organic, spontaneous effect.
- Mix with more structured forms to create a balanced, layered design.
Practical Tip: Irregular forms work best when balanced by more structured plants or hardscaping elements to prevent the garden from looking overgrown.
Combining Plant Forms for a Cohesive Look
To create a visually balanced garden, combine different plant forms using the following guidelines:
- Balance Tall and Low Forms: Place tall, upright plants at the back of a border or in the center of an island bed, with mounded and spreading plants in front.
- Contrast Shapes: Pair vertical plants with rounded or weeping forms to create visual interest.
- Create Focal Points: Use architectural or weeping forms as focal points, surrounded by softer, mounded plants to frame them.
- Repetition of Forms: Repeating similar plant forms creates unity and flow. For example, repeating columnar cypress trees along a pathway reinforces the visual line and creates rhythm.
- Varying Heights: Combine plants of different heights to create a layered effect and enhance depth and perspective.
- Use Forms to Define Space: Upright forms can create a sense of enclosure, while low, spreading forms open up a space and create a sense of expansiveness.
Form in Hardscaping and Garden Structures
Form is not limited to plants—hardscape elements also contribute to the overall structure of the garden:
- Vertical Elements: Trellises, pergolas, and obelisks create height and structure.
- Curved Forms: Curved pathways or rounded garden beds soften hard lines and create a sense of flow.
- Rectilinear Forms: Straight-edged patios, brick walls, and concrete paths create order and definition.
- Irregular and Organic Forms: Natural stone, winding paths, and irregularly shaped beds create a relaxed and naturalistic feel.
✅ Key Takeaways:
- Combine upright, rounded, weeping, and spreading forms to create contrast and balance.
- Use vertical forms to create height and structure; balance them with low, spreading forms.
- Create focal points with architectural or weeping forms.
- Repeat similar forms to create unity and flow.
- Use hardscape elements to reinforce plant forms and enhance overall structure.
The principle of form in garden design can be used to create a space that feels balanced, intentional, and visually engaging.
8. Line

Line defines the movement and structure of a garden. It directs the eye and creates a sense of order.
- Straight Lines: Create a formal, structured look.
- Curved Lines: Create a sense of softness and flow.
- Diagonal Lines: Create movement and energy.
- Zig-Zag or Broken Lines: Add complexity and visual interest.
Line is one of the most powerful design elements in a garden. It defines the movement and structure of the space, directs the eye, and creates a sense of order and flow. Lines are created by physical elements like paths, walls, hedges, flower beds, and the edges of planting areas, as well as implied lines formed by the arrangement of plants and structures.
In garden design, lines serve multiple functions:
- They guide the viewer’s gaze and movement through the space.
- They define boundaries and edges.
- They create visual rhythm and flow.
- They emphasize focal points or lead the eye toward a destination.
- They influence the overall mood and character of the garden—clean, straight lines create formality, while soft, curved lines create relaxation and flow.
Understanding how to use lines effectively allows you to control how people experience the garden and how the different elements within the space relate to each other.
Types of Lines in Garden Design
Different types of lines create distinct visual and emotional effects. Combining multiple line types thoughtfully can add complexity, interest, and movement to a garden while reinforcing a consistent design theme.
1. Straight Lines
Straight lines create a formal, structured, and organized look. They are often used in traditional and contemporary garden designs to define clear boundaries and create a sense of order and symmetry. Straight lines provide a feeling of stability and permanence.
- Examples:
- A straight path lined with boxwood hedges.
- Raised beds arranged in a rectangular grid pattern.
- A row of evenly spaced trees along a driveway.
- Straight edges on patios, lawns, and garden beds.
- Best Use:
- In formal gardens or contemporary landscapes where symmetry and order are desired.
- To create a sense of direction and lead the eye toward a focal point (e.g., a sculpture, tree, or seating area).
- To frame architectural elements like pergolas, trellises, or doorways.
- To make small or narrow spaces feel larger by reinforcing strong directional movement.
Practical Tip:
- Keep straight lines crisp and well-maintained to reinforce their formal appearance.
- If using plants to create straight lines (such as hedges), select plants that tolerate regular pruning to maintain their structure.
- Long, unbroken straight lines can feel harsh or monotonous—break them up with planting pockets or focal points to soften the effect.
2. Curved Lines
Curved lines create a sense of softness, relaxation, and natural flow. They mimic the organic shapes found in nature, helping the garden feel more connected to the surrounding landscape. Curved lines are more inviting than straight lines and create a sense of gentle movement.
- Examples:
- A meandering gravel path through a wildflower meadow.
- Flower beds with softly rounded edges.
- Circular or oval-shaped planting beds.
- A curved hedge or low wall.
- Best Use:
- In informal or cottage gardens where a natural, relaxed feel is desired.
- To create a sense of exploration or mystery by leading the viewer’s eye through the space.
- To soften hard architectural lines or angular hardscaping.
- To create depth and perspective—curves can make a narrow garden feel wider or a small space feel larger.
Practical Tip:
- Avoid excessive or sharp curves, which can appear artificial or chaotic.
- Wide, sweeping curves are more visually pleasing and natural than tight, jagged curves.
- Use curved lines to create planting pockets or small alcoves for seating or focal points.
3. Diagonal Lines
Diagonal lines create a sense of movement and energy. They break away from the traditional formality of straight lines while maintaining structure and directionality. Diagonal lines are visually dynamic and add complexity to a design.
- Examples:
- A diagonal path cutting across a lawn.
- Garden beds arranged at an angle to the house or patio.
- Diagonal patterns in paving or brickwork.
- Hedges planted at an angle to frame a view.
- Best Use:
- In modern or contemporary gardens where a sense of movement and dynamism is desired.
- To create the illusion of depth or elongation—diagonal lines can make a small garden feel larger by drawing the eye toward the farthest point.
- To lead the viewer’s eye toward a specific feature, such as a water fountain or sculpture.
- To add a sense of energy and contrast to an otherwise structured or symmetrical design.
Practical Tip:
- Use diagonal lines sparingly—too many can make a garden feel chaotic or visually overwhelming.
- Combine diagonal lines with more stable forms (like straight lines or rounded plantings) to maintain balance and cohesion.
- Diagonal lines work well with modern hardscaping materials like concrete, steel, and stone.
4. Zig-Zag or Broken Lines
Zig-zag or broken lines create complexity and visual interest. They add a sense of surprise and unpredictability to a garden, encouraging exploration and discovery. They are often used in naturalistic or woodland gardens where a sense of informality is desired.
- Examples:
- A zig-zag stepping-stone path through a shaded area.
- Broken stone or brick paving with irregular gaps.
- Hedge rows with staggered planting patterns.
- A row of shrubs planted at alternating angles.
- Best Use:
- In informal or wild-style gardens where a sense of natural randomness is desired.
- To create a feeling of movement or playfulness.
- To slow down movement through the garden and encourage exploration.
- To create layered visual depth—zig-zagging plants or paths create a multi-dimensional effect.
Practical Tip:
- Avoid overusing zig-zag lines—they can create visual confusion if not balanced with more stable elements like rounded shrubs or vertical structures.
- Use zig-zag lines to lead toward a focal point or destination.
- Broken lines can help direct foot traffic through more naturalistic planting areas.
5. Implied Lines
Not all lines in a garden are physical—some are implied through the arrangement of plants, trees, or hardscape elements. Implied lines are subtle but can be powerful in guiding the viewer’s gaze or establishing order.
- Examples:
- A row of evenly spaced trees creates an implied linear direction.
- A planting bed with a consistent height along its edge forms an implied line.
- The alignment of decorative pots along a path suggests a line even without a physical connection.
- Best Use:
- To create a sense of rhythm or unity without needing physical barriers.
- To suggest a pathway or boundary while maintaining an open, natural feel.
- To connect visually separate areas of the garden.
Practical Tip:
- Implied lines work well in naturalistic and open spaces where physical boundaries would feel intrusive.
- Use symmetry and repetition to reinforce implied lines.
- Combine implied lines with structural elements like paths or edging for added definition.
Combining Line Types for a Balanced Design
The most visually interesting gardens combine different types of lines to create contrast, rhythm, and flow:
Combine straight lines with curved lines to soften harsh edges while maintaining structure.
Use diagonal or zig-zag lines sparingly to introduce dynamic energy without overwhelming the design.
Create implied lines to reinforce the direction of pathways or planting beds.
Frame straight or diagonal lines with soft, rounded plants to prevent the design from feeling rigid.
✅ Key Takeaways:
- Straight lines create order and formality; curved lines create softness and flow.
- Diagonal and zig-zag lines create movement and complexity.
- Implied lines create visual connections without physical barriers.
- Use a combination of line types to create depth, structure, and interest.
The principles of line in garden design can be used to create a sense of harmony and flow that guides the viewer’s experience and enhances the overall impact of the garden.
9. Focal Points

A focal point creates a place where the eye naturally rests and serves as a visual anchor for the garden.
- Specimen Trees: A mature Japanese maple or flowering magnolia can act as a dramatic focal point.
- Statues and Sculptures: A well-placed sculpture or fountain draws attention and creates a sense of purpose.
- Contrasting Colors or Textures: Brightly colored flowers or plants with striking variegated leaves act as natural focal points.
A focal point is a visually dominant feature in a garden that draws the eye and anchors the design. It creates a place where the viewer’s gaze naturally rests, providing a sense of order and structure. Focal points help organize the space, direct movement, and create a sense of purpose within the garden.
In garden design, focal points are essential for creating visual hierarchy. Without them, the eye may wander aimlessly, causing the space to feel unbalanced or chaotic. A well-placed focal point adds drama and clarity, providing a clear destination for the viewer’s attention while reinforcing the overall design theme.
Focal points can be large or small, dramatic or subtle, depending on the size and style of the garden. A focal point can be a single object (like a statue or specimen tree) or a composition of elements (such as a grouping of plants or a water feature). The key is to ensure that the focal point stands out while still feeling integrated into the surrounding landscape.
Types of Focal Points
Different types of focal points serve distinct purposes depending on the garden’s style, size, and overall atmosphere. A well-balanced garden often incorporates multiple focal points, with one dominant feature supported by smaller secondary focal points.
1. Specimen Trees and Shrubs
A specimen tree or shrub is one that stands out due to its size, form, color, or texture. It naturally attracts attention and serves as a living centerpiece within the garden.
- Examples:
- A mature Japanese maple (Acer palmatum) with deep red leaves.
- A flowering magnolia (Magnolia grandiflora) with large, fragrant blooms.
- An ancient olive tree with twisted bark and silvery leaves.
- A tall palm tree or a sculptural conifer.
- Best Use:
- Place a specimen tree at the intersection of pathways to create a visual destination.
- Use a large tree to create vertical interest in a flat or open garden.
- Frame a specimen tree with lower-growing plants to accentuate its size and shape.
- In smaller gardens, use a single specimen tree or shrub as the central focus of a courtyard or patio.
Practical Tip:
- Choose trees or shrubs that provide interest across multiple seasons—such as spring flowers, summer foliage, autumn color, and winter bark texture.
- Avoid placing more than one large specimen tree within the same sightline, as it can confuse the focal structure.
2. Statues and Sculptures
Sculptures, statues, and other decorative objects create a strong focal point due to their permanence and distinct shape. Unlike plants, they maintain their form year-round, providing structure and interest even in winter.
- Examples:
- A classical marble statue in a formal garden.
- A modern metal sculpture in a contemporary space.
- A stone Buddha figure in a meditation garden.
- A rustic wooden carving in a woodland setting.
- Best Use:
- Position a statue or sculpture at the end of a path to create a sense of arrival.
- Place near a seating area or within a garden room to invite contemplation.
- Frame the sculpture with plants or trellises to give it context and balance.
- Use lighting to highlight sculptures at night and enhance their presence.
Practical Tip:
- Ensure the scale of the sculpture matches the surrounding space—a small statue can get lost in a large garden, while an oversized piece can overwhelm a small space.
- Use similar materials (such as stone or metal) for both the sculpture and hardscape elements to create cohesion.
3. Water Features
Water features are naturally eye-catching because they engage both sight and sound. The movement and reflective quality of water create dynamic focal points that shift with changing light and weather.
- Examples:
- A central stone fountain in a courtyard.
- A small reflecting pool surrounded by foliage.
- A waterfall flowing over natural rocks.
- A still pond with water lilies.
- Best Use:
- Place a water feature where it can be seen and heard from a seating area or path.
- Use moving water (such as a waterfall or fountain) to create energy and sound.
- Use still water (such as a pond) to create calm and reflection.
- Incorporate plants like water lilies, reeds, and rushes to soften the edges and integrate the feature into the landscape.
Practical Tip:
- Keep water features in scale with the size of the garden—a large pond may overpower a small courtyard, while a small fountain may get lost in a large landscape.
- Ensure that water features have proper filtration and drainage to prevent algae buildup and mosquito breeding.
4. Architectural Structures
Permanent structures such as pergolas, arbors, and trellises create strong focal points because of their height, form, and permanence. They provide vertical interest and create a sense of enclosure.
- Examples:
- A wooden pergola draped with climbing roses.
- An arched iron gate leading to a hidden garden.
- A stone gazebo surrounded by flowering plants.
- A trellis covered with clematis or honeysuckle.
- Best Use:
- Position a pergola or archway at the entrance to frame a view.
- Use an arbor or trellis to divide different areas of the garden and create a sense of passage.
- Decorate architectural structures with climbing plants to soften hard lines.
- Use a gazebo or small pavilion as a destination within the garden.
Practical Tip:
- Choose materials that complement the overall garden style—wood for rustic gardens, metal for modern gardens, and stone for classical designs.
- Use climbing plants to integrate structures into the garden.
5. Contrasting Colors and Textures
Contrasting colors and textures naturally attract the eye and can create focal points within a planting scheme.
- Examples:
- A bed of bright red tulips against a backdrop of green foliage.
- Variegated hostas with white and green leaves among dark green shrubs.
- Deep purple salvia alongside golden ornamental grasses.
- A flowering hibiscus with large, tropical blooms.
- Best Use:
- Create a focal point by placing brightly colored plants at the center or edge of a bed.
- Use contrasting leaf shapes and sizes to add texture and depth.
- Combine plants with different bloom times to maintain color interest throughout the seasons.
- Use color contrast to highlight architectural or sculptural elements.
Practical Tip:
- Limit color palettes to two or three dominant colors to avoid visual confusion.
- Use repetition of color to create unity and rhythm throughout the garden.
6. Lighting as a Focal Point
Outdoor lighting can highlight existing focal points and create new ones by drawing attention to specific features at night.
- Examples:
- Spotlights on statues or sculptures.
- Uplighting on trees to emphasize branch structure.
- Soft pathway lighting to guide movement through the garden.
- String lights over a pergola or seating area.
- Best Use:
- Use warm-toned lights for a cozy atmosphere.
- Highlight only one or two features per sightline to avoid over-illumination.
- Use subtle, indirect lighting to create shadows and depth.
Practical Tip:
- Solar-powered lights are an eco-friendly option for garden paths and borders.
- Ensure lighting is positioned to avoid glare or harsh shadows.
Creating Balance with Multiple Focal Points
Most successful gardens feature a primary focal point supported by secondary focal points to create depth and rhythm.
Place a dominant focal point at the intersection of major sightlines.
Use smaller focal points to create interest in secondary areas.
Space focal points evenly throughout the garden to maintain visual balance.
✅ Key Takeaways:
- Focal points create order and direct the eye through the garden.
- Specimen trees, statues, water features, and architectural elements create strong focal points.
- Contrasting colors and textures naturally draw attention.
- Lighting can enhance and create focal points at night.
- A well-designed garden includes both a primary and secondary focal point to maintain balance and interest.
By thoughtfully placing focal points in garden design, you can create a sense of movement and purpose within the garden, guiding the viewer’s experience and reinforcing the overall design theme.
10. Perspective and Depth

Depth creates the illusion of space and distance, even in small gardens.
- Layering Plants: Taller plants at the back, shorter plants at the front create depth.
- Framing: Trees or archways frame the view and create a sense of enclosure.
- Vanishing Points: Pathways that disappear into the distance create a sense of exploration.
Perspective and depth are essential elements in garden design, influencing how space is perceived and experienced. Depth creates the illusion of distance and three-dimensionality, making even small gardens feel larger and more expansive. Proper use of perspective and depth can lead the eye through the garden, creating a sense of movement, exploration, and mystery.
In larger gardens, depth helps prevent the space from feeling flat or monotonous, while in smaller gardens, it creates the illusion of greater size. By layering plants, creating visual lines, and using framing and focal points effectively, you can craft a garden that feels rich and immersive.
Mastering perspective and depth involves understanding how the human eye perceives space. The eye is naturally drawn toward points of contrast and areas of diminishing size or distance. You can manipulate this visual tendency by guiding the eye along pathways, through archways, or toward a focal point to create a sense of discovery and progression.
Key Techniques for Creating Perspective and Depth
Different techniques work together to establish depth and perspective, creating a visually engaging and cohesive design. The most successful garden designs often combine several of these methods to achieve a balanced, layered look.
1. Layering Plants
Layering is one of the most effective ways to create depth in a garden. By arranging plants of different heights, textures, and colors in layers, you create a natural sense of progression that draws the eye through the space. Layering adds complexity and makes the garden feel fuller and more established.
- Tall Plants in the Back: Position taller plants, such as trees, shrubs, or ornamental grasses, at the back of a border or planting bed.
- Medium Plants in the Middle: Fill the middle layer with perennials, flowering shrubs, and mid-sized grasses.
- Short Plants in the Front: Place low-growing ground covers, annuals, or small perennials at the front of the bed to soften the edges and lead the eye toward the taller background plants.
Example:
- A layered planting scheme might include tall hollyhocks (Alcea rosea) at the back, medium-height salvia (Salvia nemorosa) in the middle, and low-growing alyssum (Lobularia maritima) at the front.
Best Practices:
✅ Use odd numbers of plants (3, 5, or 7) to create a more natural look.
✅ Avoid planting too many species in a single layer, as it can create visual confusion.
✅ Use contrasting textures and colors between layers to define the separation and enhance depth.
Practical Tip:
- Leave some negative space (open areas) between layers to prevent the planting from feeling crowded.
- Use evergreen plants in the background layer to maintain year-round structure and prevent the garden from looking bare in winter.
2. Framing
Framing is a technique that draws the eye toward a specific view or focal point by creating a structured border around the sightline. Framing creates a sense of enclosure and order, helping define the boundaries of the garden while highlighting key elements.
- Natural Framing: Use trees, shrubs, or climbing plants to create a soft, organic frame.
- Architectural Framing: Use pergolas, trellises, gates, or archways to provide a hard frame that leads the eye toward a focal point.
- Layered Framing: Combine natural and architectural elements to soften the lines of hard structures and create a more natural transition.
Example:
- A stone archway leading to a shaded seating area framed by climbing roses creates a strong sense of arrival.
- A row of tall hedges flanking a central pathway naturally frames the view toward a fountain or statue at the end.
Best Practices:
✅ Use evergreen plants for framing to provide year-round structure.
✅ Ensure that the frame is symmetrical or balanced to avoid visual imbalance.
✅ Use contrasting colors or textures around the frame to draw attention toward the opening.
Practical Tip:
- Avoid placing too many frames within a small space—it can create visual clutter and make the garden feel over-designed.
- Use framing to create “windows” into different parts of the garden, encouraging exploration and movement.
3. Vanishing Points
Vanishing points are created when pathways, lines, or planting arrangements appear to converge in the distance, drawing the eye toward a specific point. This technique creates a strong sense of perspective and makes a garden feel longer or deeper than it actually is.
- Straight Paths: A long, straight path that narrows toward the end creates a powerful sense of direction and depth.
- Curved Paths: A gently curving path creates a more natural sense of movement and encourages exploration.
- Implied Vanishing Points: The alignment of plants, trees, or structural elements can suggest a vanishing point even without a physical path.
Example:
- A gravel path lined with lavender plants that narrows as it approaches a small gazebo creates a sense of depth and destination.
- A tree-lined walkway leading toward a central water feature creates a clear sense of perspective and focus.
Best Practices:
✅ Keep the vanishing point clear of distractions—avoid excessive planting or clutter at the endpoint.
✅ Use symmetry to reinforce the strength of a vanishing point.
✅ Light the vanishing point at night to maintain the effect even after dark.
Practical Tip:
- Use converging lines to lead the eye toward a focal point, such as a statue or water feature.
- Be mindful of scale—a vanishing point that disappears too quickly may feel abrupt, while one that extends too far may weaken the sense of direction.
4. Overlapping Plants and Objects
Overlapping is a technique that enhances the perception of depth by partially obscuring elements behind others. The brain interprets objects that are overlapped or partially hidden as being further away, creating a sense of three-dimensionality.
- Use Plants: Place larger plants in the foreground and smaller plants behind them to create the illusion of distance.
- Use Structures: Position trellises, fences, or walls to partially obscure the view, creating a sense of mystery and exploration.
- Use Texture and Color: Coarse-textured plants in the foreground and fine-textured plants in the background enhance the perception of depth.
Example:
- A large-leaved hosta in front of delicate ferns creates a layered effect that adds visual depth.
- A vine-covered trellis partially hiding a shaded seating area creates a sense of intrigue and distance.
Best Practices:
✅ Avoid completely blocking the view—overlapping should suggest depth, not obstruct the sightline.
✅ Use plants of different heights and textures to create a more dynamic overlapping effect.
Practical Tip:
- Layer different shades of green in overlapping patterns to enhance the sense of depth without relying on flower color alone.
- Use larger plants with bold textures at the front and finer textures toward the back to reinforce the perception of distance.
5. Changes in Elevation
Changes in elevation, even small ones, create a strong sense of depth and perspective. Raised beds, terraces, or slopes naturally create varying levels that engage the eye and establish visual hierarchy.
- Terracing: Use retaining walls or steps to create distinct planting levels.
- Mounding: Create gentle rises in the ground with soil to elevate certain planting areas.
- Sunken Gardens: Create recessed areas to draw the eye downward and create intimate gathering spaces.
Example:
- A series of stone steps leading to a raised platform with a fountain creates both elevation and perspective.
- A sloping meadow planted with wildflowers creates a natural sense of depth and movement.
Best Practices:
✅ Ensure that changes in elevation feel natural to the existing topography.
✅ Use materials that complement the surrounding hardscape and planting scheme.
Practical Tip:
- Gentle slopes and mounds are more visually pleasing than abrupt changes in height.
- Incorporate groundcovers or low-growing plants on slopes to soften the transition between levels.
✅ Key Takeaways:
- Layering plants creates depth and structure.
- Framing directs the eye toward key features and creates a sense of enclosure.
- Vanishing points create visual depth and directionality.
- Overlapping plants and objects enhance three-dimensionality.
- Changes in elevation add complexity and visual interest.
The principle of perspective in garden design can be used to create a garden that feels larger, more immersive, and visually dynamic. A well-designed garden engages the senses and invites exploration, using depth and perspective to enhance the viewer’s experience.
How to Apply These Principles
Successful aesthetic garden design is achieved by thoughtfully blending the core design principles of color, form, texture, scale, balance, unity, rhythm, repetition, and perspective into a cohesive whole. Each principle works in combination with the others to create a garden that is visually pleasing, functionally sound, and emotionally engaging. A well-designed garden guides the viewer’s eye naturally through the space, highlights key features, and creates a sense of balance and harmony.
The key to successful garden design is not just understanding these principles, but knowing how to adapt them to the unique characteristics of your site, your personal design style, and the natural environmental conditions. A garden that works with its environment—rather than against it—will feel more natural and balanced while requiring less maintenance and intervention.
Aesthetic garden design is not a rigid formula—it’s a dynamic process that requires observation, experimentation, and adjustment. Plants grow, weather patterns shift, and colors change with the seasons. A flexible approach that allows for natural evolution while maintaining a strong structural foundation will result in a garden that continues to look cohesive and balanced over time.
1. Start with a Strong Structural Framework
A well-designed garden begins with a clear structure that defines the overall shape and flow of the space. This framework provides the foundation for the planting scheme and ensures that the garden maintains visual order, even when plants are not in bloom.
- Define the Boundaries:
- Start by defining the edges of the garden with hedges, fences, walls, or natural borders.
- Use consistent materials for fences and pathways to create a unified feel.
- Ensure that the boundaries are visually consistent with the overall design style (e.g., wooden fences for a cottage garden, stone walls for a formal garden).
- Create Pathways and Movement:
- Design clear paths to guide movement through the garden.
- Use curves for a naturalistic feel and straight lines for a formal effect.
- Ensure that pathways are wide enough to be comfortable and well-proportioned to the size of the garden.
- Establish Focal Points:
- Place focal points (e.g., a tree, statue, or water feature) strategically to create structure and draw the eye through the space.
- Use secondary focal points to maintain interest in different areas of the garden.
Example:
- In a formal garden, a symmetrical pathway lined with clipped boxwood hedges leads toward a central fountain, establishing a clear and balanced structural framework.
- In a naturalistic garden, a winding gravel path lined with ornamental grasses leads to a bench beneath a tree, creating a relaxed, informal feel.
2. Establish a Cohesive Color Palette
A unified color palette helps to create visual harmony and flow throughout the garden. Color choices should reflect the mood and style of the garden, as well as the natural lighting conditions and seasonal changes.
- Limit the Color Range:
- Choose a dominant color palette of 2–4 colors to maintain consistency.
- Incorporate varying shades and tones within the same color family to create depth and interest.
- Create Focal Points with Color:
- Use bold, contrasting colors to highlight key features (e.g., a red Japanese maple as a focal point).
- Use softer, analogous colors (like blues and greens) to create a calming backdrop.
- Echo Colors Throughout the Garden:
- Repeat similar shades in different planting beds and containers.
- Use colored foliage to reinforce the color palette even when flowers are not in bloom.
Example:
- A Mediterranean-style garden might feature a color palette of terracotta, olive green, and lavender, repeated in both plants and hardscape materials.
- A cottage garden might use pastel tones of pink, blue, and white echoed in flowers, pots, and seating cushions.
3. Balance and Proportion Across the Space
Balance ensures that the visual weight of the garden is evenly distributed, creating a comfortable and harmonious feel. Proportion ensures that individual elements are sized correctly in relation to each other and the overall space.
- Use Symmetry for Formality:
- Planting identical rows of shrubs or trees on either side of a pathway creates symmetry and structure.
- Position matching planters at entry points or near seating areas to reinforce visual balance.
- Create Asymmetrical Balance for a Relaxed Feel:
- Balance a large tree or structure on one side with a group of smaller plants on the opposite side.
- Use contrasting shapes and textures to create a natural sense of balance without strict mirroring.
- Adjust Scale to Fit the Space:
- Use large plants and architectural elements in open spaces to avoid a sense of emptiness.
- Use smaller plants and fine textures in smaller spaces to avoid overcrowding.
Example:
- In a small urban courtyard, balancing a tall Japanese maple on one side with a grouping of low hostas and ferns creates asymmetrical balance.
- In a large country garden, framing a central lawn with rows of evenly spaced yew hedges creates symmetrical balance.
4. Incorporate Rhythm and Repetition
Rhythm and repetition create a sense of movement and order. When repeated patterns of plants, textures, or forms are used consistently, they guide the eye and create a sense of flow.
- Repeat Plant Forms:
- Use repeated clumps of ornamental grasses or shrubs to reinforce rhythm.
- Alternate plant shapes (e.g., rounded and spiky) to create contrast and interest.
- Echo Colors and Textures:
- Repeat key colors in planting beds and hardscape elements.
- For example, repeat lavender tones in flower beds and stonework.
- Use Pathways to Reinforce Rhythm:
- Line straight or curved paths with repeating plants or stones to create visual flow.
Example:
- A perennial border with repeated patterns of lavender, salvia, and ornamental grasses creates a rhythmic, flowing effect.
- A row of terracotta pots filled with red geraniums reinforces visual repetition along a patio edge.
5. Layer Texture and Height
Layering adds depth and complexity to a garden, making it more visually dynamic and interesting.
- Tall in Back, Short in Front:
- Place tall plants at the back of borders or beds to frame the view.
- Use medium-height plants in the middle layer.
- Finish with low-growing ground covers at the front edge.
- Mix Fine and Coarse Textures:
- Pair fine-textured plants (like ferns) with coarse-textured plants (like hostas) to create contrast.
- Use glossy foliage to reflect light and matte foliage to absorb it.
Example:
- A mixed border with tall hollyhocks at the back, medium-height salvia in the middle, and creeping thyme at the front creates a balanced, layered effect.
- A row of coarse-textured hostas paired with delicate ferns creates a contrast in texture.
6. Adapt to Your Site and Growing Conditions
Aesthetic design should work in harmony with the site’s natural characteristics and environmental conditions.
- Adapt to Sun and Shade:
- Place sun-loving plants in open areas and shade-loving plants under trees or in shaded corners.
- Work with Soil Conditions:
- Choose plants suited to the soil type (e.g., sandy, clay, or loam).
- Improve poor soil with organic amendments where necessary.
- Consider Climate:
- Select drought-tolerant plants for dry climates.
- Choose frost-hardy plants for colder regions.
Example:
- A coastal garden might feature drought-tolerant succulents and ornamental grasses adapted to sandy soil and salty air.
- A woodland garden might feature shade-loving ferns, hostas, and hellebores beneath a canopy of trees.
✅ Key Takeaways:
- Start with a strong structural framework.
- Establish a cohesive color palette.
- Maintain balance and proportion across the space.
- Use repetition and rhythm to create flow.
- Layer plants by height and texture.
- Adapt the design to fit the site’s natural conditions.
By carefully blending these principles, you can create a garden that is not only visually stunning but also balanced, harmonious, and easy to maintain—a space that evolves naturally with the seasons while retaining its structural integrity and aesthetic appeal.
The Differences Between Aesthetic and Functional (Ecological) Garden Design
Garden design can be approached from two primary perspectives: aesthetic design and functional (ecological) design. While both aim to create attractive and inviting outdoor spaces, their goals, design principles, and decision-making processes often differ. A well-designed garden often integrates both aesthetic and functional elements to create a space that is not only beautiful but also ecologically balanced and resilient.
1. Goal and Purpose
The primary goal of aesthetic garden design is to create a visually pleasing and harmonious space. The focus is on color combinations, plant forms, textures, and spatial arrangement to create an engaging and balanced visual experience. The goal is to satisfy human senses, evoke emotions, and create a relaxing atmosphere.
In contrast, functional or ecological garden design prioritizes the health of the ecosystem and the environmental benefits of the garden. It focuses on creating a self-sustaining environment that supports biodiversity, soil health, and water conservation. The visual outcome is secondary to the ecological function and resilience of the space.
- Aesthetic Design Goal: Beauty, visual harmony, and artistic expression.
- Functional Design Goal: Sustainability, biodiversity, and environmental balance.
2. Plant Selection
In aesthetic design, plant selection is driven primarily by visual appeal. Designers focus on color schemes, bloom time, texture contrast, and architectural form to create an attractive and dynamic display. Plants are often chosen based on their seasonal beauty and their ability to complement the overall design theme.
Functional design emphasizes the ecological role of plants. Native plants, pollinator-friendly species, and those that contribute to soil health or provide habitat for wildlife are prioritized. The goal is to create a self-regulating ecosystem where plants naturally thrive without chemical inputs or intensive maintenance.
- Aesthetic Design: Focus on color, texture, and seasonal bloom patterns.
- Functional Design: Focus on ecological benefits such as nitrogen fixation, pollination, and wildlife support.
Example:
- An aesthetic garden might feature a row of hybrid roses selected for their color and fragrance.
- A functional garden might feature native wildflowers and shrubs to attract pollinators and provide food for birds.
3. Design Structure and Form
Aesthetic garden design relies heavily on principles of balance, proportion, and symmetry. The aim is to create visual order and flow using carefully planned lines, shapes, and groupings of plants. Paths and structures are placed to frame views and create focal points.
Functional garden design focuses on natural patterns and organic shapes. Paths are often curved rather than straight, mimicking the flow of water or natural contours of the land. Plantings are layered to create a balanced ecosystem where taller plants provide wind protection and shade for shorter plants. Companion planting and guild planting (where different species benefit each other) are commonly used.
- Aesthetic Design: Clean lines, symmetrical beds, structured plant arrangements.
- Functional Design: Organic shapes, layered planting, and natural patterns.
Example:
- An aesthetic garden might have a formal hedge-lined path leading to a fountain.
- A functional garden might have a winding gravel path flanked by wildflowers and native grasses.
4. Maintenance and Resource Use
Aesthetic gardens are often high-maintenance because they rely on non-native plants, formal structures, and manicured lawns. Regular pruning, fertilizing, watering, and pest control may be necessary to maintain their intended appearance.
Functional gardens are designed to minimize maintenance and resource input by working with natural systems. Native plants adapted to local conditions require less water and fertilization. Mulching, composting, and rainwater harvesting are often used to reduce environmental impact.
- Aesthetic Design: High maintenance—regular pruning, deadheading, and pest control.
- Functional Design: Low maintenance—self-sustaining through natural processes.
Example:
- A formal rose garden may require regular deadheading and spraying for pests.
- A meadow-style garden with native plants may require only occasional cutting back to maintain its natural structure.
5. Environmental Impact
Aesthetic gardens can have a higher environmental impact due to the use of non-native plants, chemical inputs, and irrigation systems. Imported soils, synthetic fertilizers, and pesticides can contribute to soil degradation and water pollution.
Functional gardens are designed to have a positive environmental impact by improving soil health, increasing biodiversity, and supporting local wildlife. They often incorporate organic practices and closed-loop systems where nutrients and water are recycled within the garden.
- Aesthetic Design: May require imported soil, fertilizers, and increased water use.
- Functional Design: Promotes soil health, natural pest control, and water conservation.
Example:
- An aesthetic flower bed with exotic species may require chemical fertilizers and irrigation.
- A native planting bed with companion plants may improve soil fertility naturally and reduce pest problems without chemicals.
6. Human Experience and Interaction
Aesthetic design is focused on creating a visually impressive and emotionally soothing experience for people. Seating areas, sightlines, and walking paths are designed to maximize comfort and enjoyment. Sensory elements, such as fragrant plants, water features, and colorful blooms, are carefully arranged to enhance relaxation and contemplation.
Functional design also considers human interaction but places equal importance on ecological function. Wildlife habitats and food-producing plants are integrated with human spaces. Raised beds for vegetables, rain gardens, and pollinator habitats are placed where they can be enjoyed and easily accessed for harvesting.
- Aesthetic Design: Focus on beauty and relaxation for humans.
- Functional Design: Balances human use with ecological benefits.
Example:
- Aesthetic garden seating might be surrounded by flowering shrubs and ornamental grasses.
- Functional garden seating might be placed near a bee-friendly herb garden or under a shade tree that provides fruit.
7. Integration of Aesthetic and Functional Design
The best garden designs often integrate both aesthetic and functional principles. A garden can be both visually stunning and ecologically beneficial. For example, native wildflowers can be grouped to create bold color contrasts while also supporting pollinators. Climbing plants on trellises can provide vertical interest while also offering shade and habitat for insects and birds. Water features can serve as visual focal points while also providing a drinking source for wildlife.
Example:
- A pollinator garden planted with a thoughtful color palette can be both functional and aesthetically pleasing.
- A rain garden designed to capture runoff can be planted with striking ornamental grasses and flowering perennials.
In summary, while aesthetic and functional garden design have different priorities, they are not mutually exclusive. A garden can successfully strikes a balance between beauty and ecological function, creating a space that is both visually harmonious and environmentally beneficial. Integrating principles from both approaches ensures that a garden is not only a delight to the senses but also a thriving part of the local ecosystem.