
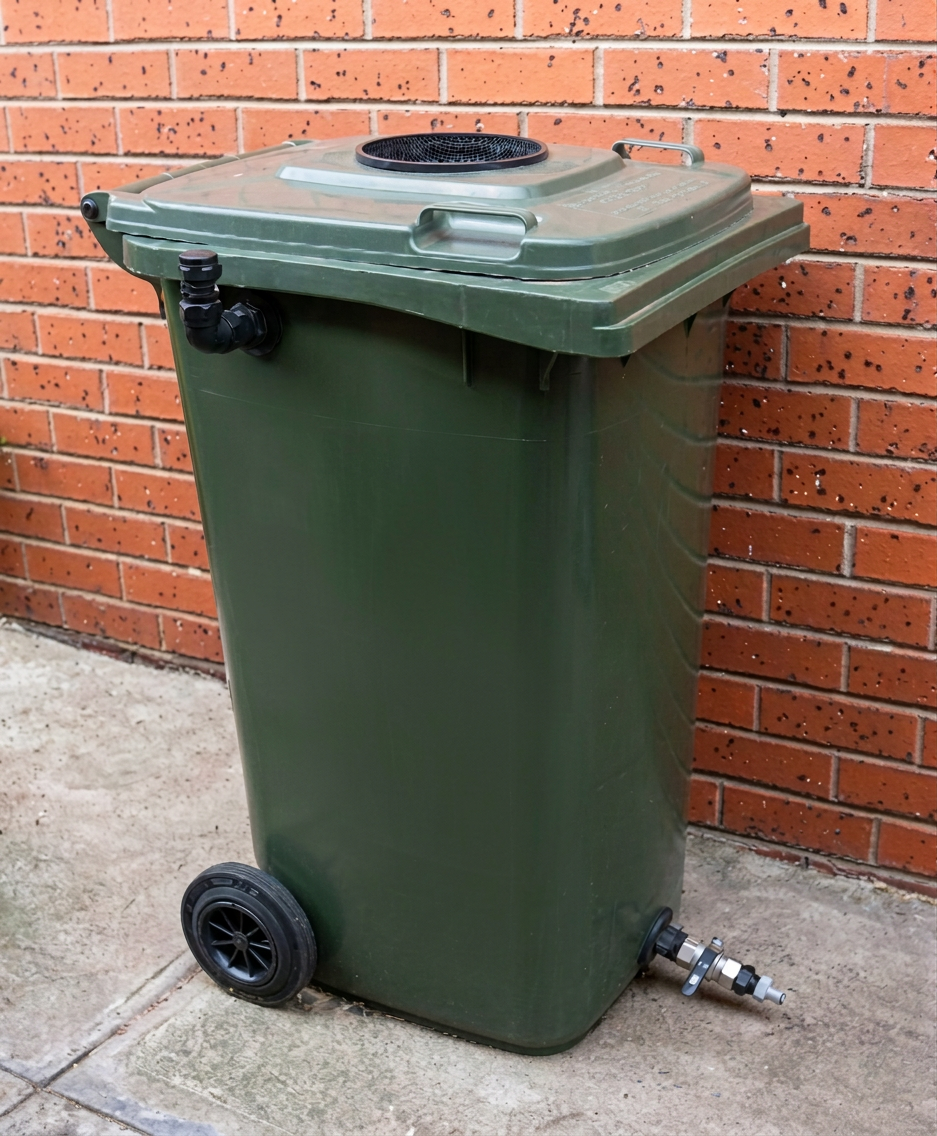
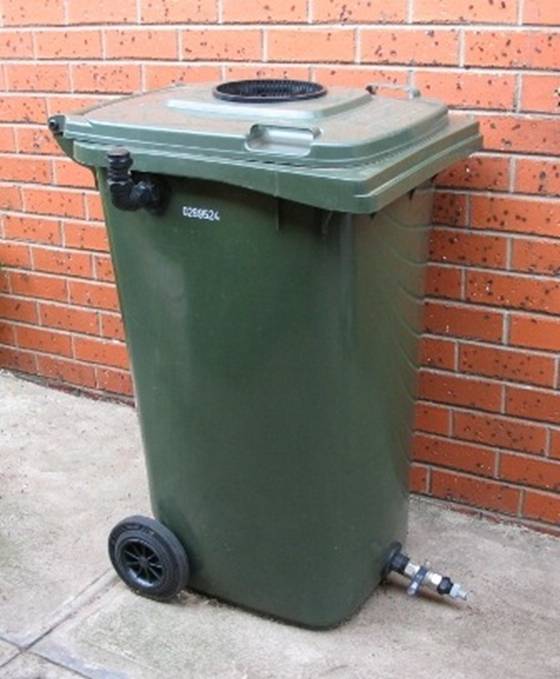
A spare wheelie bin can be converted into a compact rainwater tank for watering the garden. A 220-litre bin holds approximately 220 litres (58 US gal) of water, making it useful where there is not enough space for a conventional rainwater tank or where a small additional storage tank is needed.
This was the first rainwater storage system I built, and the original design gradually became more elaborate as I experimented with ways to improve it. The final version included an inlet filter, a tap, an overflow and an unusual bottom-draw overflow designed to discharge water from near the base of the tank rather than simply allowing newly arrived rainwater to spill from the top.
That last feature is the most interesting part of the design. It allows an overflow event to replace some of the older water at the bottom of the tank and carry out loose sediment around the pickup point. This is a self-flushing bottom-draw overflow. It can help remove loose sediment, but it does not eliminate the need for occasional tank inspection and cleaning.
NOTE: To avoid unnecessary repetition, the construction steps in this project are slightly abbreviated, as I’ve already covered the construction methods, tools and techniques in great detail in the previous project, a modular, expandable water tank system – listed here Recycled Plastic Drum Rainwater Tank under “DIY Instructions“.
How the Wheelie Bin Rainwater Tank Works
A simple rainwater tank requires only three basic components: an inlet to bring rainwater into the tank, an outlet or tap to draw off the stored water, and an overflow to safely discharge excess water once the tank is full.
A roof downpipe or rainwater diverter directs rainwater into the top of the wheelie bin via a screened inlet. A tap near the bottom allows the stored water to be used to water the garden.
When the tank is full, excess water drains through an overflow fitting near the top.
A conventional overflow draws water from the surface of the tank. As fresh rainwater enters, the water level rises until the newest water spills through the overflow.
The bottom-draw overflow works differently.
Instead of leaving the inside of the overflow fitting open, a pipe runs from the overflow fitting down to near the bottom of the tank. When the water level rises above the overflow level, water near the bottom is forced up this pipe and out through the overflow.
This serves two purposes:
- It provides the normal overflow required to prevent the tank from overflowing through the lid.
- It replaces some of the water near the bottom of the tank and can carry loose sediment from around the intake out with the overflow water.
This is an example of the permaculture principle of designing one element to perform more than one function.
How the Bottom-Draw Overflow Works
The operating principle of a self-flushing bottom-draw overflow system is based on simple hydrostatics.
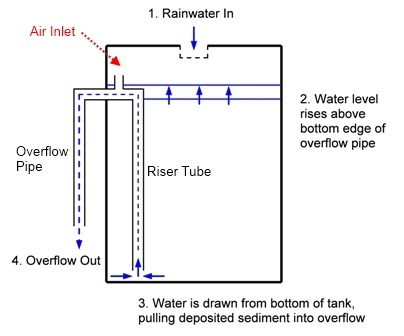
The diagram below shows how it works.
- Rainwater entering the tank raises the water level, and it cannot escape until the level reaches the overflow outlet. If the overflow outlet were just a hole on the side of the tank, water would naturally flow out from the top once the water level slightly exceeds the hole’s bottom edge.
- Adding a bottom pickup pipe—a vertical pipe running from near the base of the tank to the overflow fitting—allows water to be drawn from the bottom of the tank during overflow, while still maintaining an overflow outlet on the side of the tank.
- When the water level rises inside the tank, it also rises the same level inside the pickup pipe.
- As soon as the water level inside the tank reaches the level of the overflow pipe — the pipe that carries discharged water away from the tank — it also rises to the same level inside the vertical pickup pipe and flows out through the overflow pipe to the ground.
- As rain flows into the tank, the water level rises above the overflow fitting. Water can then flow from near the bottom of the tank, up through the pickup pipe and out through the overflow. The higher water level in the tank provides the pressure that drives the flow.
- The suction through the pickup pipe at the bottom of the tank works like an underwater vacuum cleaner, drawing out the dirt and sediment along with the water at the tank bottom.
An important complication arises when the bottom pickup pipe is connected directly to the overflow pipe. If the external overflow pipe extends below the tank and begins to fill with water, it will create a siphon. This siphon will continue drawing water even after the tank water level drops below the overflow. Once it starts, the water will keep flowing out, draining the container completely. I learned this through experience—after the tank drained itself once the water flow started through the overflow pipe.
An air vent or siphon break, usually a “T”-shaped irrigation fitting, is fitted at the high point of the internal overflow assembly. Once the water falls back to below the level of the overflow outlet, it allows air to enter the pipe to stops the siphon action and the water flow. It’s a simple but effective fix!
Design Theory
This project offers a quick guide to basic water tank design and explains how to build a simple self-cleaning system that automatically removes sediment from the tank bottom during overflow. The design can be adapted to any water tank, including large commercial storage systems.
Aligning with the permaculture principle of having things serve more than one purpose, this design uses the overflow outlet of a single tank to fulfil two roles:
- To redirect excess water that cannot be stored to other storage locations or to the garden
- To remove stagnant water and dirt from the bottom of the tank
Overflow outlets are usually located near the top of the tank. When the tank fills, excess clean rainwater flows out through a flexible pipe to another location, ideally for use elsewhere rather than draining into the stormwater system.
If all water storage options have been exhausted, the most obvious one used by nature—soil—should be considered. Soil can hold a significant amount of water. When tanks are full and rain is forecasted, pumping water into the soil instead of losing it is advisable. Letting rain naturally refill tanks optimizes stormwater usage. Unless in one of Australia’s wetter regions, there is little risk of turning the garden into a swamp.
The main issue with traditional overflows is that the fresh, oxygen-rich water that is collected is immediately expelled, while the older, stagnant, oxygen-deprived water remains at the bottom of the tank. This stagnant layer, full of sludge and sediment, provides an ideal environment for less-friendly bacteria to thrive.
If the incoming fresh water could be used to displace the old, stagnant water and remove some dirt and sludge, that would be ideal! And that’s precisely our goal here.
Construction
Building a wheelie bin water tank is quite simple and straightforward. You can create a basic water storage unit by completing just a few steps. The remaining steps are optional and can be done anytime to enhance functionality.
Materials Required
For the basic water tank:
- One clean, undamaged wheelie bin, preferably new or with a known uncontaminated history
- One removable inlet strainer or approximately 200 mm (8 in) aquatic water garden basket pot
- One 20mm threaded tank adapter or bulkhead fitting for the tap
- One garden tap or ball valve
- Appropriate hose adapter, if a garden hose will be connected
- Thread-sealing tape where required by the fittings
For the water tank overflow:
- One 20mm tank adapter or bulkhead fitting
- Overflow pipe of the appropriate diameter
- One 20mm 90-degree elbow for a conventional overflow
For the optional bottom-draw overflow:
- One 20mm tee fitting the same diameter as the overflow pipe
- One 20mm 90-degree elbow
- One length of 20mm rigid irrigation riser tube extending from the overflow fitting to near the bottom of the tank
- A short vent pipe or equivalent air-break arrangement
For the roof connection:
- Rainwater diverter, rainhead or suitable downpipe connection
- First-flush diverter where appropriate
- Suitable rainwater pipe connecting the roof drainage system to the tank
Tools Required
The work requires only basic tools:
- Electric or cordless drill
- Hole saw 25mm for the 20mm tank fittings
- Electric jigsaw, keyhole saw or another suitable tool for cutting the inlet opening
- Tape measure
- Marker
- Adjustable spanners
- Fine sandpaper or a deburring tool
- Saw suitable for cutting the overflow pipe
Step 1: Select the Wheelie Bin
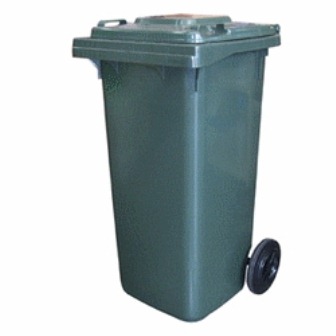
First, obtain a wheelie bin, whether new or recycled, to contain the water.
Begin with a sound wheelie bin that has no cracks, splits, badly degraded plastic, or damaged seams. Since a full wheelie bin can be quite heavy (220kg for a 220-litre bin – water weighs 1kg per litre), it might burst if its structure is weakened.
This design can be effortlessly customized and adapted to suit any type of water container.
Step 2: Prepare the Inlet Filter – Water In!
A medium-sized, 20cm aquatic basket pot, commonly used in water gardens and ponds, functions as the water inlet filter.
This removes large debris, such as leaves, before it reaches the tank and prevents mosquitoes from entering and breeding in the water tank. The basket pot can be lined with shade cloth for even finer filtration.
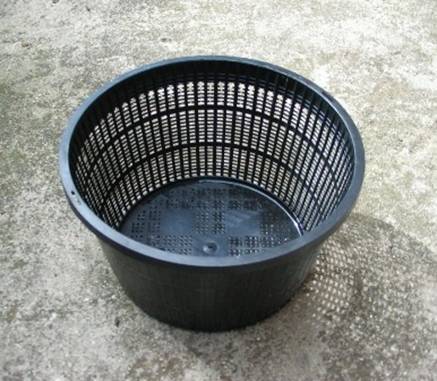
Step 3: Cut the Inlet Opening
A hole needs to be cut into the lid of the bin to fit the water inlet filter (the aquatic basket pot).
- Place the basket or inlet strainer on the wheelie-bin lid and mark the opening.
- Cut the hole with an electric jigsaw or any other suitable hand saw that can cut curves, such as a keyhole saw.
- Remove any rough edges.
Note: The opening should be sufficiently large to allow the body of the basket to pass through, yet smaller than its upper flange to ensure the basket rests securely on the lid instead of slipping into the tank. The pot features a wider lip, which helps support the pot’s position.
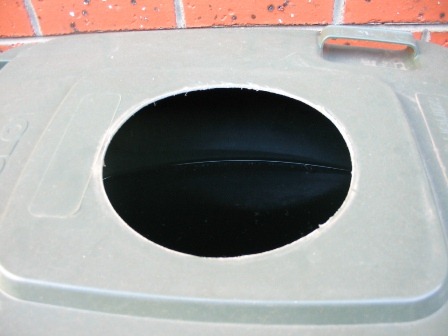
Step 4: Fit the Inlet Filter
Fit the water inlet filter (the aquatic basket pot) into the hole in the lid of the wheelie bin.
It should be a nice snug fit with no gaps around its edge.
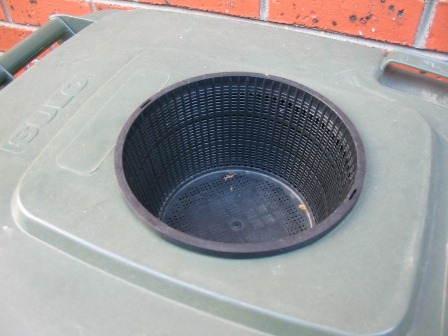
Step 5: The Outlet – Water Out!
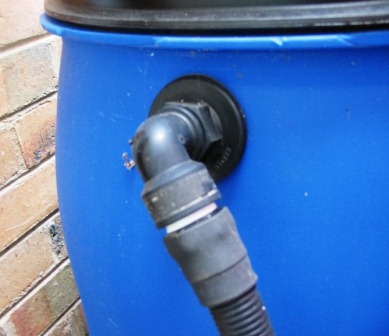
Now that we can get water into the bin, we will also need a way to get it out! To fit a tap to the tank, we will need a 20mm threaded tank adapter or bulkhead fitting, as pictured below. The tap screws into this fitting.
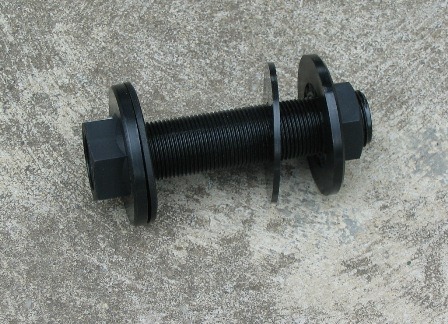
Step 6: Mark the Position of the Tap
Mark the drilling location for the outlet tap on the wheelie bin. The outlet should be positioned around 10 cm (4 in) above the bottom. For this project, the tap has been placed 10 cm (4 in) from the bottom edge of the front, and centered.
Positioning the tap just above the floor creates a small gap underneath, allowing sediment to settle instead of going directly into the tap.
The outlet can be installed on the front or side, depending on the tank’s location. The tap can be placed wherever needed. If space is limited and front clearance is necessary, it can be positioned on the side, for example.
Before drilling, ensure there’s sufficient space inside the bin for the tank adapter and adequate clearance outside for the tap or ball valve.
Step 7: Drill the Outlet Hole
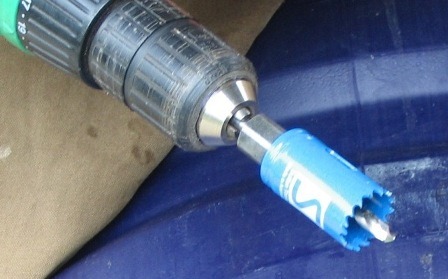
To drill a precise, hole for the threaded adapter that will be watertight once it is fitted, use an electric or cordless drill equipped with a holesaw (as pictured below) or a step drill.
- Select a hole saw that matches the required cut-out diameter for the particular tank adapter.
- Drill the hole at the marked location.
- If there are any rough edges or burrs around the edges of the hole after it has been drilled, carefully smooth them off both inside and outside the tank with fine sandpaper. A tank fitting seals against the surface of the container, so a rough or distorted edge can prevent the washer or gasket from sealing properly.
Do not make the hole larger than necessary.
The outer diameter of the 20mm threaded tank adapter is 25mm, so drilling a hole with a 25mm holesaw will provide a snug fit.
Step 8: Fit the Tank Adapter
- Insert the 20mm threaded tank adapter through the tank wall, ensuring the sealing washers or gaskets are on both sides of the tank. Place the softer rubber washer inside the tank to create a seal in the water area, and position the tougher washer outside, as it is more durable and resistant to sunlight degradation.
- Tighten the 20mm threaded tank adapter with two adjustable spanners, one on each side, that is, one inside the tank and one outside. Tighten the fitting sufficiently to compress the seal, but do not overtighten. Excessive force can distort the wall of a plastic container or damage the washer.
How to Use Teflon Tape on Threaded Plumbing Joins
Threaded irrigation fittings and taps, like the ones described in the next steps below, need to be sealed with Teflon plumber’s thread-sealing tape before they are screwed together. The tape fills the small gaps between the mating threads and helps prevent water leaking through the threaded joints.

Here are a few tips on how to use Teflon plumber’s thread sealing tape on threaded (screw) joints of irrigation fittings to create watertight joints that won’t leak:
- Hold the threaded fitting in your left hand with the threaded end facing towards you, as shown in the picture.
- Hold the roll of Teflon tape so it resembles a snail, with the tape feeding from the bottom of the roll. This makes it easy to keep the tape under tension as it is wound around the fitting.
- Starting near the end of the threaded section, but without covering the opening, lay the tape across the threads.
- Looking at the end of the fitting, wind the tape clockwise, following the direction of the threads. Keep the tape under light tension as you work along the threaded section, overlapping each turn slightly.
- Apply around seven turns of tape, then tear it off and press the loose end firmly against the threads.
The direction in which the tape is wound is important. These fittings screw together clockwise, so wrapping the tape clockwise means that tightening the fitting also tightens the tape around the threads. If the tape is wound in the opposite direction, it can bunch up or unwind as the fitting is screwed into place.
Holding the roll “snail-wise”, with the tape feeding from the bottom, also makes the job much easier. The tape can be kept taut against the threads while winding. If the roll is held the opposite way, the tape tends to unroll ahead of the fitting and is much harder to keep tight and neatly wrapped.
Keep the tape entirely on the threaded section and do not wind it across the opening of the fitting, where loose pieces could be pushed into the pipework when the fittings are assembled.
Note: Connections sealed with a rubber washer or an O-ring, like the screw-on hose click fittings at the end of a tap, do not require Teflon tape, as the rubber washers or rings effectively seal the connection.
Step 9: Fit the Tap
To control water flow, a tap or ball valve is needed. The ball valve opens completely with a quarter turn of the lever, offering convenience, but it is more expensive than a standard garden tap, which works just as effectively.
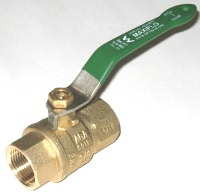
When buying a brass garden tap, select one with the correct-sized threaded outlet (where the water comes out and a hose connects), as these come in two sizes, 19mm (3/4″) and 25mm (1″).
In all Australian states, the standard brass garden tap outlet size is 3/4″, except for NSW, where a 1″ outlet tap is used.
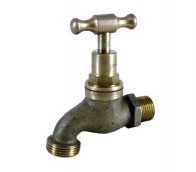
When purchasing the fittings, make sure the tap or ball valve screws into the 20mm threaded tank adapter. If it doesn’t, additional fittings will be needed, so make sure these are all on hand before commencing!
The threads at the back of the tap should screw directly into the hole at the end of the tank outlet. If the threaded section at the back of the tap is too small to fit the tank outlet, a reducing bush—a threaded plastic adapter—can be used to screw a smaller fitting into a larger hole.

To attach the tap to the 20mm threaded tank adapter:
- Wrap the threads of the tap with teflon thread sealing tape (as shown below) for a watertight fit.
- Screw the tap or ball valve into the to the 20mm threaded tank adapter (bulkhead fitting).
An additional hose fitting can be attached to the tap if required. Keep in mind that a gravity-fed water tank provides much lower water pressure than a mains-connected garden tap, so water will flow through a hose more slowly, particularly if the hose is long or runs uphill. It will also not flow higher than the water level in the tank!
This is the finished outlet tap setup. I’ve installed a few additional fittings so I can connect a garden hose directly to the click-fitting at the end.
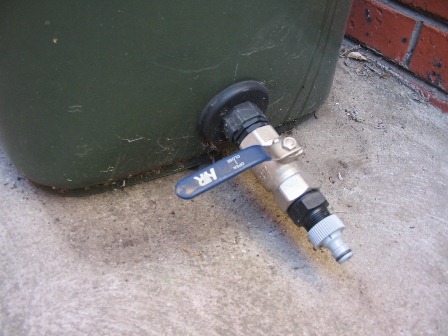
At this point, the wheelie bin can already function as a very basic rainwater tank. It has an inlet and an outlet, it will collect and dispense water, and if that is sufficient, then the project is complete.
It still requires an overflow before connecting to a roof catchment. If you’d like to add some “few more bits,” continue reading…
Step 10 – Install the Overflow Fitting
An overflow is an additional outlet positioned higher on the tank’s side, allowing excess water to escape when the water level reaches it. This prevents water from spilling over the top of the tank and flooding the area around it once the tank is full. By attaching a pipe to the overflow outlet, the excess water can be directed to a drain, garden, lawn, another tank, or any preferred location.
To install the overflow fitting:
- Mark the overflow position near the top of the bin, at the level where the water should drain out. The bottom of the overflow opening determines how high the normal maximum water level will be. Leave enough space above this level so incoming water does not immediately reach the underside of the lid.
- Drill the overflow hole using the same method as for the tap fitting, with a drill fitted with a holesaw.
- Fit another 20mm threaded tank adapter to the overflow tank fitting.
- Screw a 20mm elbow fitting (“L”-shaped) to the 20mm threaded tank adapter. Use Teflon plumber’s tape on the threads, screw it together, and turn the elbow fitting so the external opening of the water outlet points down.
- Attach the necessary fittings to the 20mm elbow for the type of hose being used. A washing machine drain hose is an inexpensive and effective option, and the rubber fitting can be slipped onto a 20mm fitting to secure it.
These overflow fitting pictures are from the more detailed Recycled Plastic Drum Rainwater Tank project:
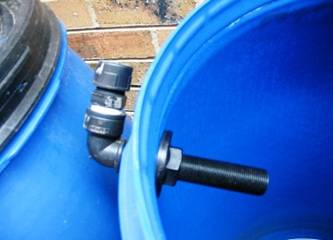
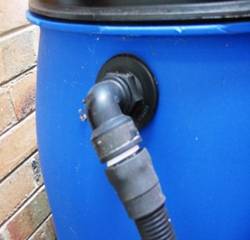
Your tank is now set up with a reliable basic overflow, just like the one on my main water collection system, and it’s effectively “flood-proof”. If you’re happy to keep things simple, you can stop here—but if you’d like to add extra features for even better performance and ease of use, read on for the next practical steps.
Step 11: Build the Self-Flushing Bottom-Draw Overflow
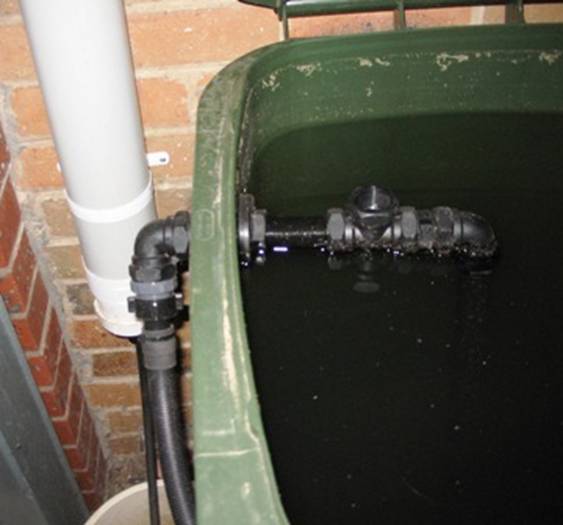
The image below shows the siphon cleaning system installed inside the wheelie bin tank. The overflow draws water and sediment from the anaerobic zone at the tank’s bottom and directs it to the stormwater drain or another outlet.
NOTE: In the picture below, the overflow on the left is capped and turned upwards because the tank was temporarily disconnected from use. This is a preventative measure to prevent mosquitoes from entering and to avoid long-term water stagnation in the fitting. Normally, it points downwards with an overflow pipe connected, as shown in the other photos below.
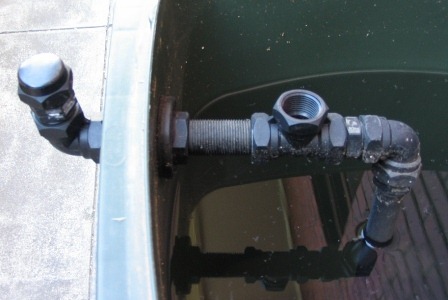
To set up the overflow siphon:
- Attach a 20mm “T-piece” to the overflow 20mm threaded tank adapter inside the tank. This serves as an air vent or suction breaker, allowing air to enter the overflow pipe and preventing the tank from self-draining when water flows through it. Point the top of the 20mm “T-piece” upwards.
- Next, attach a 90-degree or elbow joint (“L”-shaped) to the opposite side of the 20mm “T-piece”, then angle the elbow joint downward so that the open end points toward the bottom of the tank. The vertical pickup pipe will be attached to this.
- Sit a 20mm irrigation riser tube inside the tank, beside the elbow joint, running vertically downward until its lower end is close to the floor of the tank. This will be the the pickup pipe, which will need to be cut to length before fitting. For a 220-litre bin, it should be approximately 60cm long and when connected to the elbow joint should reaches the tank’s bottom. Trim the tube if needed for a proper fit. It can sit at an angle, as long as it contacts the bottom.
- Once the pickup pipe is cut to length, cut several notches into the lower end of the pipe so water can enter even if the pipe rests against the tank floor, as shown in the diagram below. This assists water flow and sediment collection while preventing blockage. Alternatively, leave a small clearance underneath when fitting. Do not push the end of the pickup pipe flat against the bottom.
- Slightly rotate the elbow to provide additional space for inserting the pickup pipe at an angle. Then, turn the elbow so that the end of the pickup pipe moves closer to the bottom of the tank.
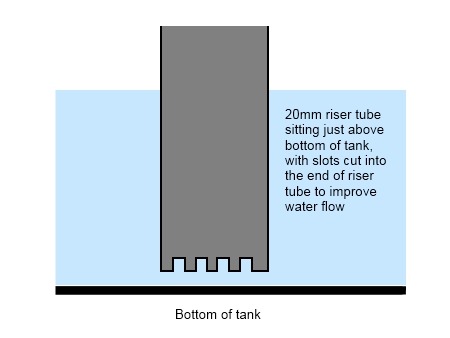
If the tank overflows, water and sediment is drawn from the bottom region of the tank into the pickup pipe, then it moves upward to the overflow fitting and exits through the external overflow pipe.
The air vent stops the overflow pipe from turning into a continuous siphon, which would keep draining the tank after rainfall ceases.
Step 12: Position Tank, Connect Overflow Hose and Water Inlet
Locate the wheelie bin water tank near the rooftop collection point, such as a stormwater downpipe.
The overflow should be directed to a safe location that can handle heavy rainfall. The simplest solution is to channel it into the lower part of the stormwater downpipe directly below the collection point, which is its usual path when there is no water collection system.
It can also be directed into a garden, orchard, rain garden or a filter bed system that leads into a pond. From a permaculture perspective, overflow water is still a useful resource, so rather than sending it straight off the property, it can be directed through the landscape and put to further use. The overflow can feed a swale, infiltration basin, rain garden or heavily mulched tree basin, where the water spreads out, slows down and soaks into the soil.
In an orchard, overflow can be directed through shallow basins or swales around fruit trees, increasing the amount of rainfall stored in the root zone. On sloping sites, a series of connected swales or basins can allow water to overflow from one area into the next, progressively distributing it across the landscape. This follows the permaculture principle of slowing, spreading and soaking water, using the soil itself as an additional water-storage system once the tank is full.
Another option is to direct the overflow through a reed filtration bed or constructed wetland before it enters a pond. The vegetation and filter material slow the water and trap sediment, while the pond provides the final storage point. In this kind of system, the same rainfall is used several times: first as roof water stored in the tank, then as overflow watering plants and recharging soil moisture, and finally as water stored in a pond.
The aim is to create a sequence in which water moves progressively from one useful storage or growing area to another, rather than treating tank overflow as waste water that simply needs to be removed.
The rainwater can be collected directly from a stormwater downpipe, or from a rainwater diverter fitted to the stormwater downpipe.
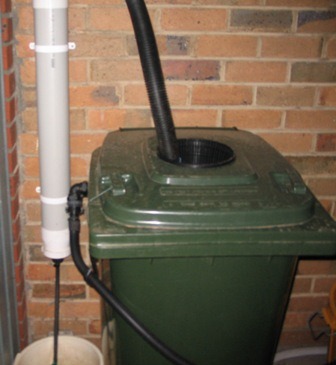
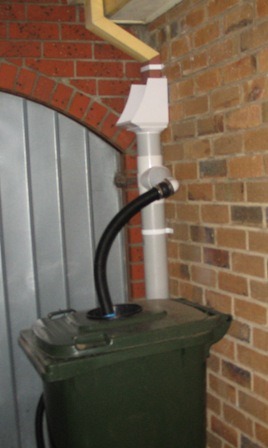
In the images below, I show how I’ve arranged the tank. I attached a flexible 40mm agricultural pipe (also known as Ag pipe or Aggie pipe – the non-perforated type without holes!) to a rainwater catcher/first-flush diverter. The end of the 40mm Ag pipe simply sits inside the inlet filter basket.
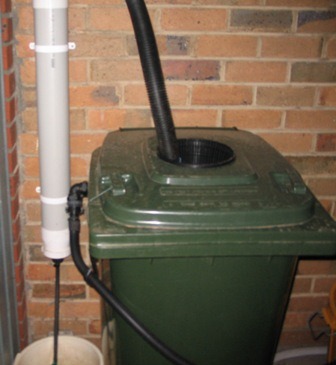
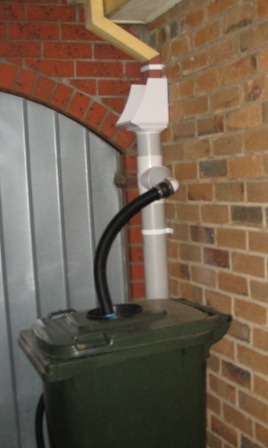
Here’s the whole assembly, from gutter to bin!
This stormwater pipe is fitted with a leaf-shedding rainhead, which uses an angled metal screen to intercept and deflect leaves, twigs and other larger debris carried from the roof and gutters before they can enter the rainwater collection system. Rainwater passes through the openings in the screen and continues down the pipe, while most larger debris is shed from the outside of the rainhead rather than accumulating inside the pipe or being washed into the tank.
Removing this material before it reaches the tank reduces the amount of organic debris that can settle and decompose in the stored water, and also reduces the likelihood of inlet pipes, first-flush diverters and tank screens becoming blocked. The screen should still be inspected and cleaned periodically, particularly where the roof is surrounded by trees or receives large amounts of leaf litter.
A leaf-shedding rainhead is a coarse pre-filter, not a substitute for a first-flush diverter. It removes larger material, while the first-flush diverter captures the initial roof runoff containing finer dust, dirt, bird droppings and other contaminants that can pass through the rainhead screen.
This flows into a first-flush diverter, which captures and diverts the first runoff from the roof at the beginning of a rainfall event. This initial runoff usually carries the greatest amount of accumulated dust, bird droppings, leaf litter and other debris washed from the roof and gutters, so diverting it prevents much of this material from entering the water tank.
Once the first-flush chamber has filled, subsequent cleaner rainwater continues through the pipe to the tank. Many first-flush diverters slowly drain the captured water through a small flow restrictor after the rain has stopped, automatically resetting the chamber for the next rainfall event. The drain hole or flow restrictor needs to be checked and cleaned periodically because fine debris can block it. Australian Government guidance gives around 10 litres of first-flush diversion for every 50 m² (538 ft²) of roof catchment as a typical sizing guide, although the appropriate volume can vary with roof conditions and local requirements.
How Quickly Will a 220-Litre Tank Fill?
Even a small roof can fill a wheelie-bin tank surprisingly quickly.
A useful rainwater calculation is:
1 mm of rain falling on 1 m² of roof produces a theoretical maximum of 1 litre of runoff.
For example, a small 20 m² (215 ft²) shed roof receiving 10 mm (0.4 in) of rain receives:
20 m² × 10 mm = 200 litres
before allowing for losses.
That is almost enough rainwater to fill a 220-litre wheelie bin from empty.
A 20 mm rainfall event on the same roof represents approximately 400 litres of water, meaning roughly half the roof runoff would have to pass through the overflow if the tank began empty.
This demonstrates why overflow capacity is important even on a very small rainwater tank.
Using Water from the Wheelie Bin Tank
The simplest way to use the stored water is by gravity through the tap.
Because a wheelie bin is not very tall, the water pressure from the tap is fairly low. It is generally adequate for filling watering cans and can provide a slow flow through a short hose to a lower part of the garden, but it should not be expected to perform like a mains-pressure garden tap.
Elevating the tank increases the gravitational pressure but also creates a significant structural load on whatever is holding it up. Any stand supporting several hundred kilograms of water must be designed accordingly. It is not practical to elevate water tanks to increase pressure, as the height required to achieve a significant increase in pressure is not practical.
For a small garden system, leaving the tank at ground level is usually the simplest arrangement. Even with the tap close to the ground, a short length of hose attached to the tap makes it easy to fill watering cans or buckets, or to run a length of hose on fairly level ground to a nearby garden bed.
In summary, this covers the setup of a basic water harvesting system to start collecting rainwater. As shown in the instructions, it can be kept simple or made more elaborate. While a more complex system offers greater convenience, it also raises the setup costs.
The best advice is to start simple and expand it from there to suit your needs. This is likely the most efficient method and also the least intimidating.
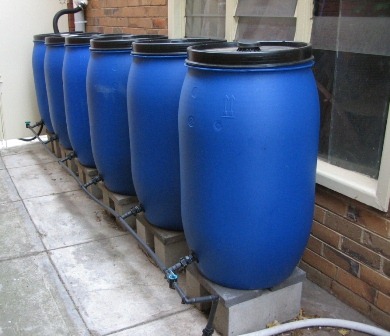
To illustrate the point, here’s how my single wheelie bin system evolved into my current setup.
The small wheelie bin system shown served me effectively for over a year. Afterwards, I experimented with a modular, expandable setup using recycled plastic drums, which proved to be more affordable and durable than conventional wheelie bins.
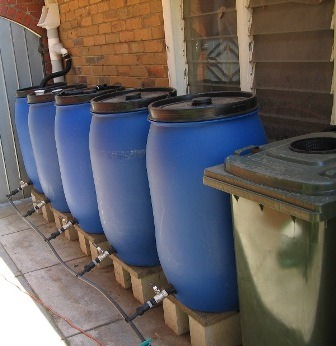
The water storage system was expanded yet again. This is my water storage system today…
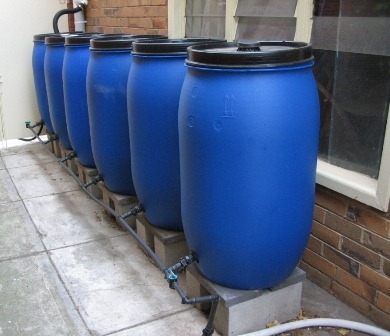
The wheelie bin water tank remains in use, positioned near the blue tanks (just outside this photo’s view), allowing me to pump in extra water as my storage fills up.
The six blue tanks have a combined capacity of 1320L (6 x 220L), and the wheelie bin adds another 220L, bringing the total to 1540L. This represents nearly 15% of my overall water storage, so it continues to contribute meaningfully to the system.
And it all began with a simple wheelie bin…
For more useful information on water harvesting, see the articles below:




Thanks for the detailed instructions, and for your great site overall! I posted this link to Twitter. I lived in an urban caravan park for some years and collected rainwater off the roof of the laundry-room there. One rainy summer I met 100% of my water needs from rainwater. WIth more containers for storage, I could have done that even in the less-rainy times.
I aquired extra 240L wheelie bins and checked through your website and walla! You have a fabulous instructions on creating additional water storage. I cannot speak highly enough of your website as a resource. Love your work.
Thomasina says
Hi I have just finished reading your site about how to make a home wheelie water bin and more. You can choose how far you want to go or how much water you want to collect, so I am keen to make one up for my centre.
There would be many uses for it and knowing that it is natural and clean makes it even better. Thank you ever so much for your clear instruction to make a Recycled Plastic Drum Rainwater Tank. Awsome…..
Give this a go….. Brilliant ……. Natural and pure…….
Very good, but would the overflow water not go through the open tee at the top rather than from the bottom of the tank?
Hi Rick,
The top of the tee-fitting is higher than the overflow pipe, so when water rises to a certain level, if flows along the horizontal part of the tee fitting and out of the overflow pipe on the side. Once water flows, it can only draw on more from the bottom.
Regards
Self Cleaning Is Excellent Idea – Would There Be any advantage having two Risers Say One Each Side of The Bottom Of The Container – Would It Improve Cleaning??
Using one riser gives a stronger suction effect, using two risers will in effect halve the force of pull in each one and won’t pull up the sediment as easily. It’s the force of the water rising upwards that carries the debris up off the bottom.
Very good idea.
Wondering if you have seen the product tankvac.
Same principle as yours but more for larger tanks, would like to know if you could build diy, as $300 seems on the steep side
I love the idea of self cleaning as I live on rural property and only source of water is rain water.
I see some rain water tank sizes and wonder about stagnation, people seem to have a large amount of rain water storage of over 150,000 litres these days,
Cheers
Pulpo
Hi, I just learned of your site from Geoff Lawton’s online PDC. Your work is stupendous! I love your site, it’s wonderfully chock full of information! I have some questions regarding the self-cleaning siphon. For a multiple tank system like yours, do you install a self cleaning siphon in each of the tank or just the first one? Would the siphon work as well for the second, third, fourth, etc tank or would the siphoning pressure get halved, quartered, etc?
Thanks for your praise! With the multiple water tank system I find that the dirt really just accumulates in the first tank, and only the first tank really needs an overflow pipe, so that’s where you would install a self-cleaning siphon.
Hi. You have such a wonderful, very informative site. We just recently purchased an acre property in Central Florida, USA and i have been researching on the best use of the land. I am very interested in rain harvesting systems as well as greywater systems. I would copy your rainwater harvesting system, do you also have a diy greywater system? Any info on such? Thanks. Tess
Brilliant instructions and diagrams. Thanks! I often get halfway through such “How Tos” and give up, overwhelmed by technical details, but yours was clear right to the end and left me feeling confident that it not only made sense but that I could actually do it too. Have some odd bits of guttering and pipes lying around here so think I’m going to change a few components and give it a go. Just need to source some recycled bins here in NZ.
One thing use pex its a flexible plumbing pipe that will not burst when frozen or bent great for this project very easy to use and very resilliant will not change anything about the system just make it a little more durable for more extreme climates. as a pvc pipe break could cost you all your water.
Good tip if anyone is using PVC pipe. There is no PVC pipe used in this design, hope that helps!
HI there, thanks so much for these instructions, I could find info of people trying to sell me such a set up, but no one seemed to want to say how to make your own!
I have one question, which is what kind of water pressure do you get from the tap on the wheelie bin? Is it strong enough that you can stand up and hose the garden, or do you need to empty the water into buckets? Thanks!
When the tank is full the pressure is quite high, I’ve used it to water the garden with a very long hose and it works fine. The water pressure is far less than mains water pressure as it’s gravity fed but it does work. As you would expect, as the water level drops, so does the pressure. When the water reaches the bottom, I just lay the hose on the ground and let the remaining water trickle out slowly on its own into a garden bed or beneath a tree.
Oh OK that is great news! I will proceed with my project and let you know how we go 🙂 Thanks for getting back to me so quickly!
I am curious if the outlet end of the overflow siphon pipe needs to be lower than the inlet end of the suction vacuum tube inside the barrel?
The outlet pipe doesn’t siphon because of the air inlet that is fitted at the top of the outlet pipe. Water flows out of the outlet pipe whenever the water level goes higher than the level of the outlet pipe itself, in the same way that it would come out if there was a hole at the side of the bin where the outlet pipe sits, whenever the water goes past that level, it flows out.
The beauty of this design is that when the water goes above the outlet level, the water that it flushes out first is the water at the very bottom of the bin, where the dirt sits, making it self-cleaning.
If for some reason you wanted the tank to siphon, leave out the air inlet at the top of the outlet pipe, or seal it, that would make it a self-emptying tank! In that case, yes, connect a pipe to the outlet that sits lower than the inlet end that sucks the water up, and it will work perfectly as a siphon!
Yes, now I understand better. That makes sense.
Thanks for your details instructions. After seeing the Tankvac clip my feeling was it was just physics & I could build the same thing but needed to confirm the details – glad I was diligent in my search ’cause I found your site – Gratitude for your knowledge & experience giveaways
You’re welcome 🙂
Hi.
We excitedly purchased new rainbarrels when we purchased our home but the overflow has never worked out and we don’t want to risk the overflow damaging our foundation. The barrel we purchased just had a knob near the top to cut off to attach a hose for overflow or to direct to another barrel (we sadly don’t have room for that) and it has never really worked out. The hardware store sold us this plastic piping that we used hose clamps on however the plastic piping just became brittle and cracked. I am hoping we can adapt to your overflow design. (I plan to print off your instructions as we head to the hardware store!)
What size hose do you recommend for the purpose of quick overflow redirection and are the 20mm threaded tank adapter and 20mm elbow fitting (“L”-shaped) hard to find? I thought my husband was trying to find similar pieces in the past and had difficulty. How durable was your washing machine style hose over the course of a summer?
Thanks for your guidance! I hope to set up 3 more barrels around the house this summer if we can just make this 1st one work! 😉
The 20mm fittings are common and the washing machine hose has lasted many years and is still going well.
I love your site. Thank you for the great information! I do have some questions about the multiple barrel setup. How are the barrels connected? Just from the outlets on the bottom? How does the water flow from one barrel into the next. Sorry but I can’t see anything else connecting them. I currently have two barrels hooked together joined near the top so one acts as an overflow into the next. Is there something similar on yours that doesn’t show in the pictures? I apologize in advance if this is a stupid question. Thanks.
Thanks for your comments!
Yes, you’re correct, the barrels are all connected together from the outlets on the bottom of each barrel. As the rain comes in and fills the first barrel, it flows out of the outlet and fills all the tanks until they are all at the same level. The only overflow is on the first barrel that the rainwater flows directly into, and the overflow pipe goes to the garden because when the first tank is full, they all are. Hope this helps 🙂
Hi, we are on a rural property with multiple rainwater tanks – just a tip – never connect tanks together at the base – always connect via overflows – this allows the first tank (water in) to be a settling tank where debris builds up but more importantly if one tank or pipe leaks it only empties one tank, not all of them…..
Thanks for your comment, yes, that’s an excellent idea if you have large water tanks, and the overflow pipes are a very large diameter. With the smaller 250L (44 gallon) plastic tanks, when I first built them, they were all connected via overflow pipes using 20mm (3/4″) tank spigots and polypipe, but when it rained hard, the narrow overflows wasn’t able to drain fast enough into the next tank, so a lot of water overflowed out of the top of the first tank onto the ground. It’s possible to use larger diameter tank spigots, pipes and connectors, but this gets very expensive when connecting many small tanks together. Having the tanks connected at the bottom allows me to draw water from all of them via gravity, without a pump.
For big rainwater harveting tanks, I agree with you 100%, connecting them via the overflows using large diameter pipes is the better way to do it.
Thanks for this the instructions are so very clear love the site.
I I would like to know what the prices of the blue 240 litre containers and where can I get hold of them and do they deliver
That’s a very hard question to answer because we’re an international website, we have readers worldwide and I can’t assume anyone lives in the same city, state or country as me!
Great tutorial and love your set up. Can you explain if and how the bins are connected to each other please? I’m assuming you have some sort of set up whereby when the first bin is full the water diverts to the second and so on. Looking at the photo it seems all the overflows are connected but l’m not sure how this would fill the bins further down the chain. Many thanks
Hi Niki, the article with information on the blue drum water tanks pictured, which explains the construction and how it all works, is here – Recycled Plastic Drum Rainwater Tank system
This is an excellent idea for a ‘stealth’ water tank. In some cities in New Zealand the councils are studying aerial photographs and if they spot you have a water tank your sewerage charge increases. They assume you may be using this water in the house and sending more water into the public system!
Sorry no they don’t, in fact they encourage each house hold to have tanks to at least 1000 litres if not more.cheers steve
Sounds like like depends on which city in NZ you’re in!
As per many other comments, your idea is great. I wish to install the system in our 5000 liter house tank with a diameter of 2.1m. Being larger than a wheelie bin is it better to position the riser tube (100mm dia. in my case) in the center of the tank. The other option I have seen on another website is to place a pipe with ” suction holes ” across the diameter of the tank at the base. Please advise if either or both of these options will help. Many thanks
Warren
Since you want water to be drawn across a wider area to clean as much of the bottom of the tank as possible, it would be better to place a pipe with suction holes across the diameter of the base of the tank. If the riser pipe is in the centre, the setup will look like an inverted T-shape, if the pipe is place on one side it will look like an L-shape. I was thinking that you might have to cap the ends otherwise most of the water will flow in from the large end openings and less through the smaller holes. Let us know how it goes!
I have used your self cleaning design adapted to 2 gravity flow household water systems with remarkable results.
Excellent! That’s great news, thanks for sharing.
Hi Angelo, thanks for showing this idea. I have a slightly different version that works a treat. It’s very, very simple requiring only one length of PVC tubing. No fittings required. Is there any way for me to upload a pic to describe it?
I’ve made a video to describe it. Here’s the link:
Great post and please keep posting a helpful article like this! Thank you, cheers!
Fantastic. I’m actually currently adapting this idea – the siphon pulls from the bottom of a 220 elevated barre (which already acts as an overflow for another system!)l, then dumps it in the top of a three stage water filter (gravel-sand-charcoal) which then trickles into a smaller drum and gets used for seedlings / topping up the hydroponic systems.
Good idea to siphon the bottom, I can use that both for my wheelie tank & my 5000 one too, cool idea
I wonder why tanks don’t come with siphon on purchasing?
Moderator, pls feel free to add “Melbourne Australia”
Thx Dave
Probably because it’s extra complexity and extra cost, but that’s only a guess!
Hi Angelo
On some commercial versions of this vac system they have what is referred to as a syphon generator on the outside of tank which is a short looking pipe. This seemingly having the effect of increasing the flow rate at the outlet. Can you tell me if your instructions will generate enough vacuum to forcefully release the sediment filled water from a larger 10000L tank.
Hi Peter, thanks for your question. I didn’t base this design on commercial systems, I just worked it out on my own from basic principles, around ten years ago. In the initial design, the siphon worked brilliantly but it didn’t stop once it got started until it emptied the whole tank, simply because I forgot to add the air inlet which breaks the vacuum when the excess water has drained out via the overflow. This design works presented here works on the small scale of a wheelie bin tank.
Your question prompted me to go and look at how the commercial systems sold currently actually work, and I did notice some differences. The commercial ones are designed for large tanks, so the inlet pipe sits horizontally on the floor of the tank and runs its whole width, to draw up sediment across the whole breadth of a large tank, this is an important feature for a large scale tank.
The short pipe you mention outside the tank is nothing more than a wide PVC overflow pipe, and because of the large volume of water rushing out, due to its weight a high pressure is created in the siphon. The only thing that’s different is the ‘flow generator’ attached to the end of the overflow pipe. What does this component do? Looking at the technical brochure of one such commercial product, I found the following information – “…uses a patented Flow Generator which removes air from the pipe carrying the overflow water”. I’m guessing when using such a large bore overflow pipe, air must be evacuated so the pipe can fill with water to generate the full flow of water in the siphon. Looking at the patented design, the overflow pipe contains a restriction device inside it which creates enough fluid flow turbulence to dissolve the air back into the water within the outlet of the siphon.
If I were building a similar system to a commercial one for a large tank, I would use an inlet pipe along the bottom with holes along its length and the end needs to be sealed so water is only sucked in through the holes. Perhaps something like slotted agricultural drainage pipe (Ag-pipe) may work, otherwise you’ll need to drill a length of fairly thick irrigation pipe for the purpose. Hope this helps!